Return to my Checkers pages
Go to my home page
American Position - an important ending
Copyright 1996, Jim Loy
You may print this and show it to others. But, this article will eventually be
part of a book that I am writing. So, please do not distribute it widely.
If you need help reading checkers notation, please print out the
numbered board.
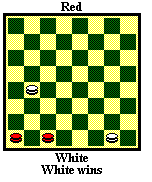
Diagram #1
shows the American Position, an important ending by Brooks. White has the move
here: 32-27 30-26 (29-25 27-23 25-29 17-21 same) 17-21 26-30 27-23 29-25 23-18
25-29 18-22 WW
This kind of loss can happen when you can't get a king into a double
corner. When the win is there, it is probably fairly easy. Usually the
important trick is knowing about the win, and trading down to diagram #1 or
some position resulting from diagram #1. If the defender has the move, the draw
is easy.
 Sometimes
the defender must struggle to avoid the American Position. Diagram #2 shows a
clever draw (by C. Hefter, in Duffy's Standard Positions), in which Red
avoids the American Position: 9-13 1-6 21-25* (13-17 6-10 17-22 10-14 22-25
23-26 25-29 26-30 29-25 14-18 WW) 23-18 (6-10 25-22 draw or 23-26 25-22 draw)
13-17* 6-10 17-21* (Threatens 17-22 and a draw) 18-23 25-22 easy draw.
Sometimes
the defender must struggle to avoid the American Position. Diagram #2 shows a
clever draw (by C. Hefter, in Duffy's Standard Positions), in which Red
avoids the American Position: 9-13 1-6 21-25* (13-17 6-10 17-22 10-14 22-25
23-26 25-29 26-30 29-25 14-18 WW) 23-18 (6-10 25-22 draw or 23-26 25-22 draw)
13-17* 6-10 17-21* (Threatens 17-22 and a draw) 18-23 25-22 easy draw.
 I
encountered the position shown in diagram #3, while studying openings,
recently. Red wins: 25-22 19-16(A) 22-18 16-12 27-23 (or 13-17 to same)
20-16 23-19 (or 13-17 to same) 16-11 19-16 (or 13-17 to same) 11-8 (or 11-7 to
First Position) 13-17 (into the American Position) 21-14 18-9 8-4 9-6 12-8 6-10
8-3 16-12 4-8 10-15 8-4 15-11 RW.
I
encountered the position shown in diagram #3, while studying openings,
recently. Red wins: 25-22 19-16(A) 22-18 16-12 27-23 (or 13-17 to same)
20-16 23-19 (or 13-17 to same) 16-11 19-16 (or 13-17 to same) 11-8 (or 11-7 to
First Position) 13-17 (into the American Position) 21-14 18-9 8-4 9-6 12-8 6-10
8-3 16-12 4-8 10-15 8-4 15-11 RW.
A - 19-15 22-18 15-10 27-23! 20-16 23-19 16-12 13-17! 21-14 18-9 12-8 (10-7
19-15 RW) 19-15 10-7 15-11 RW.
Return to my Checkers pages
Go to my home page