 Diagram
#2 is easily recognized as First Position. Let's see what happens if Red
foolishly moves 3-7? 19-16 32-27 16-12 27-32 (27-23 15-11 WW) 12-8 7-11 15-19
WW.
Diagram
#2 is easily recognized as First Position. Let's see what happens if Red
foolishly moves 3-7? 19-16 32-27 16-12 27-32 (27-23 15-11 WW) 12-8 7-11 15-19
WW.Return to my Checkers pages
Go to my home page
Copyright 1996, Jim Loy
You may print this and show it to others.
But, this article will eventually be part of a book that I am writing. So,
please do not distribute it widely.
If you need help reading checkers notation, please print out the numbered board.

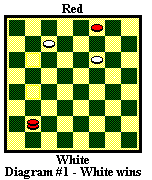
Diagram #1 is a version of First Position, from Payne, 1756 (Yup, that's a year), considered the most important family of endings in checkers.
White has the move (See my article on the move). He will soon have two kings. Red will continue to have only one king, which will have to seek refuge in the double corner 32 & 28. And Red has a piece. White will skillfully and patiently force that piece toward the same double corner. Then, the double corner will become too crowded. Incidentally, if Red can get his piece to the left side (toward 13 or 21), he has an easy draw.
If you don't want to study this ending just now, at least learn to recognize First Position, know that it is a win, and know that it is difficult. Each of these diagrams is typical of First Position. Look at them. And remember that it works only if the side with two kings has the move.
From diagram #1, let's begin: 6-1 25-22 1-6 22-26 (22-18? 11-7 WW) 6-10 26-23 11-7 23-27 (3-8 10-15! 23-27 15-19! 27-32 7-3 8-12 leads to the same position in fewer moves) 7-2 27-32 (27-23 or 27-24 will be similar) 2-7 32-27 7-11 27-24 10-15 24-27 15-19 27-32 11-15. Let's look at diagram #2:
 Diagram
#2 is easily recognized as First Position. Let's see what happens if Red
foolishly moves 3-7? 19-16 32-27 16-12 27-32 (27-23 15-11 WW) 12-8 7-11 15-19
WW.
Let's go back to diagram #2, and defend better: 32-27 15-18 27-32 18-23 32-28 23-27 28-32 19-23. Let's look at diagram #3.
 White is
trying to force Red to move 3-8. So, let's not move 3-8 until we have to. 3-7
loses the piece quickly to 27-24.
Let's continue from diagram #3: 32-28 27-32 28-24 32-28 24-20 23-19 (23-18? 20-16 18-15 16-11 draw) 20-24 19-15 24-27 15-18 27-32 18-23. And this is diagram #4:
 In
diagram #4, Red finally must move 3-8. Then White has to back off. Let's
consider what would have happened if Red had moved 3-8 earlier. White would
then have forced 8-12, just as we will soon see. And Red would only have sped
up his own demise. Incidentally, in diagram #4, if the piece happened to be on
2, instead of 3, then Red could draw easily with 2-6-9-13.
Continuing from diagram #4: 3-8 28-24 32-28 24-19 28-32 19-15 32-28 23-19 28-32 19-16 8-12 16-19, diagram #5:
 Diagram
#5 looks just like diagram #2, except that the piece has made 2 moves. We've
taken 32 moves to accomplish this.
From diagram #5: 32-28 (32-27? loses right now) 15-18 28-32 18-23 32-28 23-27 28-32 19-23!, diagram #6:
 From now
on, White must be even more careful! 32-28 (12-16 27-24 16-20 24-27 helps
White) 27-32 28-24 23-18! (32-28 24-19 draw) 24-28 (12-16 is the same as the
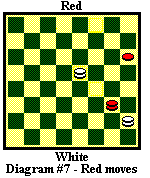
move before diagram #8) 18-15 28-24 (12-16 15-11 16-19 32-27 28-32 27-31 32-28
11-16 WW) 32-28, diagram #7:
 From
diagram #7: 24-27 (24-20 15-11 12-16 28-32 16-19 32-28 19-23 11-15 23-27 28-32
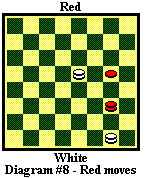
WW) 15-18 12-16 (27-32 loses right away) 28-32 27-24 18-15, diagram #8:
 From
diagram #8: 16-20 (16-19 32-27 WW or 24-28 18-22 16-19 32-27 28-32 27-31 32-28
11-16 19-24 16-19 WW) 15-18 24-19 32-28 19-16 (20-24 18-23 WW) 18-23 (Easier
now?) 16-11 23-19 11-8 28-32! 8-11 32-27 11-8 27-23 8-11 23-18 11-8 18-15 WW.
Finally, 92 moves later.
Different people will have learned different things from this article. Remember: First Position is a win which takes many moves.
Which positions conform to First Position? Answer: 2 kings (with the move) against king and a piece. The piece cannot escape to the far side of the board. The king cannot escape to the opposite double corner (the one "behind" the piece).
The procedure: Force the piece to advance by immobilizing the king. The king and piece cannot both fit in the double corner, so the king is forced out, where his situation is hopeless.
And, both players must be careful!