Return to my Checkers pages
Go to my home page
The Move
Copyright 1996, Jim Loy
You may print this and show it to others.
But, this article will eventually be part of a book that I am writing. So,
please do not distribute it widely.
If you need help reading checkers notation, please print out the
numbered board.

"The move" in checkers is like the "opposition" in chess. And it is of
importance in many endings. In diagram #1, whichever player is not
moving next, has the move. If Red moves, he loses. If White moves, he has to
retreat to the double corner, to draw.
In diagram #2, whoever moves has the move, and a win.
 In diagram
#3, whoever moves has the move, and a win. This shows that the move can
involve several pieces. So how do we calculate who has the move, in even more
complicated endings? One way, that often works well, is to pair up the pieces,
and cancel out the ones which oppose each other. In diagram #3, we have pairs
20 & 12, and 19 & 11. They cancel each other out, and we only have to
look at the two remaining pieces (7 & 17) to determine who has the move.
In diagram
#3, whoever moves has the move, and a win. This shows that the move can
involve several pieces. So how do we calculate who has the move, in even more
complicated endings? One way, that often works well, is to pair up the pieces,
and cancel out the ones which oppose each other. In diagram #3, we have pairs
20 & 12, and 19 & 11. They cancel each other out, and we only have to
look at the two remaining pieces (7 & 17) to determine who has the move.
A more universally applicable method is as follows: When it is your
turn to move, consider the 4 columns marked by the little arrows in diagram
#3. They are the columns which have dark squares (squares on which
pieces can sit) closest to you. Remember that the dark squares on a checker
board are shown as light squares on a diagram. These columns are called your
"system." Total up the number of pieces in your system. Here the total is one.
If this number is odd, you have the move, if it is even, your
opponent has the move.
 In diagram
#4, White to move has the move. He has two options, 30-25 or 26-22. What should
he do? Well, the trade with 26-22 loses the move and the game. So 30-25 2-6
26-22 (25-21 also draws) 18-23 22-18 (easiest) 6-10 (23-26 18-15 is an easy
draw) 25-21 23-26 (10-6 18-15 draw) 18-14 (loses the move, but here it is OK)
draw.
In diagram
#4, White to move has the move. He has two options, 30-25 or 26-22. What should
he do? Well, the trade with 26-22 loses the move and the game. So 30-25 2-6
26-22 (25-21 also draws) 18-23 22-18 (easiest) 6-10 (23-26 18-15 is an easy
draw) 25-21 23-26 (10-6 18-15 draw) 18-14 (loses the move, but here it is OK)
draw.
In diagram #4, we saw a couple of trades which changed the move. Do all
trades change the move? No! The normal trade is when the piece that
captured first is captured next. This kind of trade always changes the move.
Other trades will have to be calculated afterwards, as it depends on which
columns the pieces are in.
An interesting question
I have an educational question that you may enjoy working on. Let me
first quote from Checkers Made Easy, by Arthur Reisman:

System for Determining the Move
The columns of squares which indicate by the counting formula
whether you have the move are pictured in the two diagrams.
Surveying the above [at left] figures you will observe that by
utilizing the four columns having the bottom square based along your kingrow,
you can learn who has the move thusly:
It being your turn to play, add up the pieces on these squares and
if the sum is odd, you have the move; if the sum is even, your opponent has the
move. Should there be no pieces on your counting squares then use your
opponent's columns and add thereon. In this case the solution is reversed -- an
even sum of pieces denotes you have the move and odd indicates the other side
has it.
A word of caution -- be sure that each side has the same number of
pieces when applying this rule.
Notice the two sentences: "Should there be no pieces on your counting
squares then use your opponent's columns and add thereon. In this case the
solution is reversed -- an even sum of pieces denotes you have the move and odd
indicates the other side has it." Now, here's my educational question: Can
you determine if these two sentences are correct or incorrect? You may want
to review the earlier parts of this article.
The answer: The answer is that the two sentences of Reisman's are
absolutely false. Reconsider your logic if you got that wrong. Then read the
following explanation:
The explanation: First of all, you should probably have noticed
that when there are "no pieces on your counting squares," that's zero, an even
number. So, your opponent has the move. So, what is wrong with Reisman's logic?
If each player has the same number of pieces, then the total number of pieces
is even. So when there is an odd number of pieces in my system, there is an odd
number in my opponent's system. When there is an even number in my system,
there is an even number in my opponent's system. So it doesn't matter whether
you use your own system or your opponent's system. You get the same result. And
Reisman's statement that "the solution is reversed" is absolutely false.
You should have gained plenty of insight by considering this question.
 Here's a
simple ending (diagram #7). What should the result be? Think about it, without
moving pieces on the board.
Here's a
simple ending (diagram #7). What should the result be? Think about it, without
moving pieces on the board.
Solution: This position is a draw. If you didn't get that result, try
again. The drawing move is: 24-19* simple draw.
 On the right (diagram #8) is a simple position which dramatically
illustrates the power of the move, White to move and win.
On the right (diagram #8) is a simple position which dramatically
illustrates the power of the move, White to move and win.
The solution is 7-11 WW. This was a trade which did not change the
move.
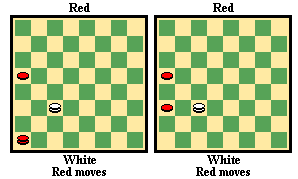 The two diagrams on the left (diagrams #9 and #10), and
similar positions (in the left one, the White king may be on 21), are common in
checkers, particularly at the end of problems, perhaps with other pieces on the
board. You may have encountered diagram #10 above (when solving diagram #7).
With other pieces, Red may either run out of moves or move back and forth for a
draw. In the both of these diagrams, technically neither player has the move,
as the numbers of pieces are not equal. But Red must lose a piece, and then
White will have the move and the win.
The two diagrams on the left (diagrams #9 and #10), and
similar positions (in the left one, the White king may be on 21), are common in
checkers, particularly at the end of problems, perhaps with other pieces on the
board. You may have encountered diagram #10 above (when solving diagram #7).
With other pieces, Red may either run out of moves or move back and forth for a
draw. In the both of these diagrams, technically neither player has the move,
as the numbers of pieces are not equal. But Red must lose a piece, and then
White will have the move and the win.
Return to my Checkers pages
Go to my home page