Return to my Checkers pages
Go to my home page
A Simple Ending
© Copyright 2000, Jim Loy
You may print this and show it to others. But, this article will eventually be
part of a book that I am writing. So, please do not distribute it widely.
If you need help reading checkers notation, please print out the
numbered board.
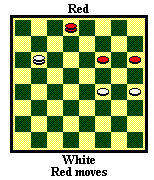
 This position
may look like a WW. As White, you may aim for this position, thinking it is a
win. As Red, you may avoid this position, thinking it is a loss. It turns out
that it is an easy draw. You should actually figure that out beforehand. You
should also be aware of the simple trick shown in note A.
If you were Red in this position, you would probably draw it easily, like
this: 2-7 9-14(A) 7-3 14-18 (19-15 gives away the move for a draw, or
14-10? 11-15 RW) 3-8 19-15 8-4 draw. All of Red's moves were forced. But the
draw was easy.
A - 9-6 7-3 (Showing off. 7-2 is the easy draw) 6-2 3-8* (A simple trick
which comes up often. If instead 3-7? 19-15 WW) 2-7 8-3 (or 8-4) 7-16 3-8 (or
3-7) draw.
A Grandmaster would see this position coming up, would probably not
recognize it as a standard position, and would calculate what happens if the
Red king goes to 4 and 8.
Return to my Checkers pages
Go to my home page
 This position
may look like a WW. As White, you may aim for this position, thinking it is a
win. As Red, you may avoid this position, thinking it is a loss. It turns out
that it is an easy draw. You should actually figure that out beforehand. You
should also be aware of the simple trick shown in note A.