Bill Smith's Unofficial Cub Scout Roundtable
A compendium of Ideas For Cubmasters, Den Leaders and those who help them.
Making your program fun and worthwhile.
Home 
Boy Behavior
Blue and Gold
Ceremonies
Character & Ethics
Cheers & Applause Stunts
Cub Scout Camping
Den Program Planning
District and Council
Games
Good Turn For America
Inspiration
Jamboree 2001
Magic
News
Outdoor Fun
Pack Administration
Pack Meetings
Parents
Places to Go
Preparation For Boy Scouts
Projects
Scout Links
Songs
Stories
Three Magic Words
Training
Webelos Activity Badges

Search 

CUB SCOUT

PROJECTS

Fun Stuff for boys to make at home and in den meetings.
 
DID YOU KNOW....
When a boy makes or builds something - like a model plane, a boat or a car - 
 he often imagines it in action: 
flying, sailing or racing, as he works on it? 
His mind is as active as his hands.

 
INDEX
 PROJECTS FOR BOYS
RESOURCES
BOARDS
MAKING MUSIC
 RESOURCES AND MATERIALS
CUB SCOUT COOKING
 MAGNETS & ELECTRICITY
FOIL COOKING
CAMP STOVES AND OVENS
MAKING BUTTER
ROCKETS
 TIN CAN PLANETARIUM
THINGS THAT MOVE
PUPPETS
GENIUS KITS
INSTANT INVENTOR PROBLEMS
BOATS
THINGS THAT FLY
TEETER BOARDS
 NATURE PROJECTS
PARADE STUFF
WHITTLING
 SILK SCREEN PRINTING
LINKS

Back to Roundtable
Please sign In
Last Update: 8/23/07
PROJECTS FOR BOYS
Generally speaking, boys like certain kinds of projects. Here are some basic rules to help you choose projects that will go over well and contribute to their growth:

What will it do? Boys like to make things that do something. Pinewood derby cars, boats, kites and catapults do things. They run, fly, throw things or explode. Girls, at this age, are already aware of form and beauty - boys usually don't care. Watch boys build things. They spend most of their time playing with a half finished model, visualizing what it will do. What it looks like is low priority.

What is it made of? Wood is good. Large is better. Collect large cartons, scrap wood and other similar stuff. He needs to learn to manipulate material. Start thinking of the help you will need to handle all this - let parents know you will need them.

What is the process? Using tools is usually popular. Do things that are as messy as you can stand. Big painting projects, papier mache and cooking all fit this category. Dainty and cute are not going to make it here.

At this age, building projects help a boy in several ways: it stimulates his imagination, it develops hand-eye coordination, it enhances his ability to go from a mind’s eye view to a physical creation. Use projects to build den game equipment, scenery and costumes for skits, camping gear and den snacks.


Projects are activities where Cub Scouts make things that are useful: that is, the things fly, make a lot of noise, explode or help the Cubs do other neat things.

Do not confuse Projects with craft: making things that are pretty or cute. 

Cub Scouts are not into pretty or cute.

To Project Index
Back to Roundtable


RESOURCES

SCROUNGING
Tips from Scouters on-line.
I found one of my pride and joys at a thrift shop. I was looking for an old tux jacket with tails to use as a ringmaster costume for the circus theme pack meeting. As I was looking this jacket leaped off the rack into my arms. Someone had donated an old smoking jacket. It was Red with black satin trim. I paid the $2, added eppalets(sp?), and that jacket has been more places than I have. I ALWAYS get asked where I got it and I love to tell the story.
Chuck Dobbs
RECYCLE MATERIAL
      1. Puppets - recycle old wooden spoons, Popsicle sticks, small pieces of fabric, for marionettes, small Pringles cans for bodies
      2. Leather work - I recycled a suede leather jacket into an Indian Brave's vest which was decorated by my son with fabric crayons and used the cutaway pieces for small leather projects such as leather head ties for the finished feather (Wolf), comb cases, pocket change holders (Cub How-To Book), there are free patterns at Tandy's also.  The jacket came into the local clothing closet and was too soiled to keep (they cost a fortune to clean).  It cost nothing, but you might get a bargain at the local thrift store.  I just turned the soil over or sometimes inside the sleeve is pristine.  Old purses and wallets can also be recycled.
      3. Wood scraps come into our green box site (recycling, garbage center).  We ask the attendant to save things for us.
      4. We scarf up old wheels at the "dump" for Cubmobiles.
      5. End rolls of newsprint - either gotten free or very cheap from the Newspaper or Recycler.  The newsprint makes great B&G place mats, scenery.
      6. The internal cardboard tube can be sawed into about 7 miniature Tom Toms.
      7. We recycle our busted sledding or "tubing" inner tubes for the Tom Tom tops.
      8. Busted bike  inner tubes (gotten free out of the garbage at the Bike shop).  After the kids practice patching a tire on them, they can be used for the inner tube gym, which is in the Webelos Resource Book (I think).
      9. The two liter bottle rockets are real popular.  Let me know if you need more on that.  We've discussed this before.
      10. The "Clorox" pig (other critter, your creation).  I buy liquid detergent and wondered what to do with the "heavy" plastic bottle.  I've also cut it up with heavy shears (broke the sewing  shears) and used it for fin materials for the bottle rockets, pattern material for projects.
CT - Jan, WDL, Nederland, CO - Long's Peak Council
To Project Index
Back to Roundtable
Two recipes 
FOR COLORING METAL
An old time method to blacken steel parts: gather berries from the Sumac plant, wrap them in cheesecloth and then put into a kettle of boiling water. Cook for a bit, then put in the parts to blacken- remove when satisfied with the color.
To "age" brass hardware, degrease the component with lacquer thinner and use gun blue, available from any sporting goods store. It's cheap, the results are instantaneous, and it works well on nonferrous and some plated ferrous metals, and is safe to use. Finish the effect by stropping with steel wool to affect "wear" spots, and spray with a clear flat lacquer. 


Boards

The Magic Transformation of a Board
Great for blue and gold awards.
Two Rivers Cncl. Pow Wow 1979
Cub with scissors It's not what the boy does to the board that matters, it's what the board does to the boy. 
Bud Bennett
PAPER CLIP CHALLENGE
(Bear Elective 4)
AIM: To Introduce Electromagnetism.
TIME: Around 20 minutes.
MATERIALS REQUIRED:
Compass
Lots of wire with crocodile clips attached
Battery in holder
Nails
Paper clips
METHOD:
Place wire (attached to battery) over compass with the wire parallel to the compass needle.
Note direction that needle is deflected.
Note the similarity between the effect of a magnet and the effect of a current in a wire on a compass. Use two wires or a bigger battery to increase the deflection of the needle.
Coil wire around a nail to create an electromagnet which can pick up paper clips. Give each group a nail and a long piece of wire so they can make as powerful an electromagnet as possible. Test the electromagnets by attempting to pick up paper clips. The group whose electromagnet can pick up the most paper clips is the winner.
Explain why the current magnetizes the nail.
SEEK—


To Project Index
Back to Roundtable


MAKE A COMPASS FROM
A PENNY AND A PAPER CLIP


Bend a steel paper clip or short length of wire cut from a metal clothes hanger into the shape shown in the diagram. Magnetize the wire by stroking it with the pole of a strong magnet. Then balance the wire carefully on the surface of a penny so that it can swing freely. Make sure that you stand clear of the magnet or other metal objects. 

The wire will swing around and point to magnetic north (or maybe south if you used the other pole of the magnet.)

Some refrigerator magnets will work for this.
Or you could use the electromagnetism method described in Elective 4 of the Big Bear Book.

MAKING A SWITCH
Collect a battery and a light of the same voltage (electronic supply stores have these), electrical wire, two brass paper fasteners, a paper clip and an index card.  Use a hole punch to punch two holes in the index card, about 1" apart.  Put a brass paper fastener through the paper clip and then through one of the holes in the index card.  Put the other fastener through the other hole.  Cut three short lengths of electrical wire and remove a small amount of insulation from each end.  Attach one wire to the ends of one paper fastener and the battery, one wire to the battery and the light, and the final wire to the light and the ends of the second paper fastener.   Show the boys the circuit and demonstrate how the light comes on when the paper clip is positioned to touch both paper fasteners.  Tell them that the paper clip is like a switch.  When it touches both paper fasteners, the circuit is complete and the light will come on.  When it is not touching, the circuit is not complete and light will not come on.
To Project Index
Back to Roundtable
THE AMAZING ELECTRIC LEMON
 
Materials:
Clean galvanized zinc nail
2 ' insulated copper wire
X-ACTO or utility knife
Small flashlight bulb
Electrical tape
Large lemon
Clean penny

Cut your wire into two 1' sections and strip off one inch of insulation from all four ends of wire.  Attach one end of each wire to the light bulb so that one end is touching the metal threads on the sides and the other is touching the metal cap on the bottom.  Being careful that the two wires do not touch, secure them with electrical tape.
Cut two small notches into opposite sides of the lemon with your knife.  Insert the penny halfway into one notch and the zinc nail halfway into the other.  Be sure that the penny and the nail do not touch.  Take one of the free ends of wire and tape it to the nail.

Now when you touch the remaining exposed end of wire to the penny, the flashlight bulb should give off a faint glow.
Try this same experiment with different fruits, such as oranges, grapefruits and limes.  Rate the amount of light given off by each fruit battery.  The more acidic the fruit, the brighter the light.

Greater St. Louis Area Council
 
OLD FASHION TELEGRAPH SET
Telegraph key

   Related to Bear Elective 4. You need a six volt battery with two terminals, tin can, small flat file or emery cloth, metal shears, two wood blocks, bell wire, screws, and nails.  Cut metal pieces from can, bend as shown, and remove sharp edges with file or emery cloth. Fasten to blocks with screws. Hammer In nails for the receiver. Wire as shown.
   In wrapping wire around nails, start at the top of one nail and work down.  Then go across to the other nail and work up. Have at least eight turns of wire on each nail.
   When you close the switch, the receiver (sounder) will be pulled down to the nails and make a click. If your boys want to practice Morse code, see page 451 of the Boy Scout Handbook).


To Project Index
Back to Roundtable


PEEP SHOW TO THE STARS
can planetarium Star Charts
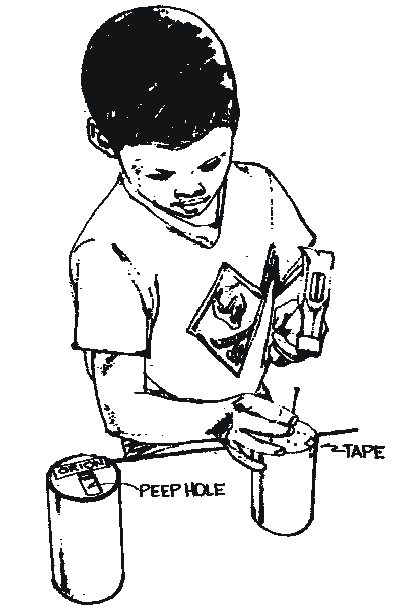
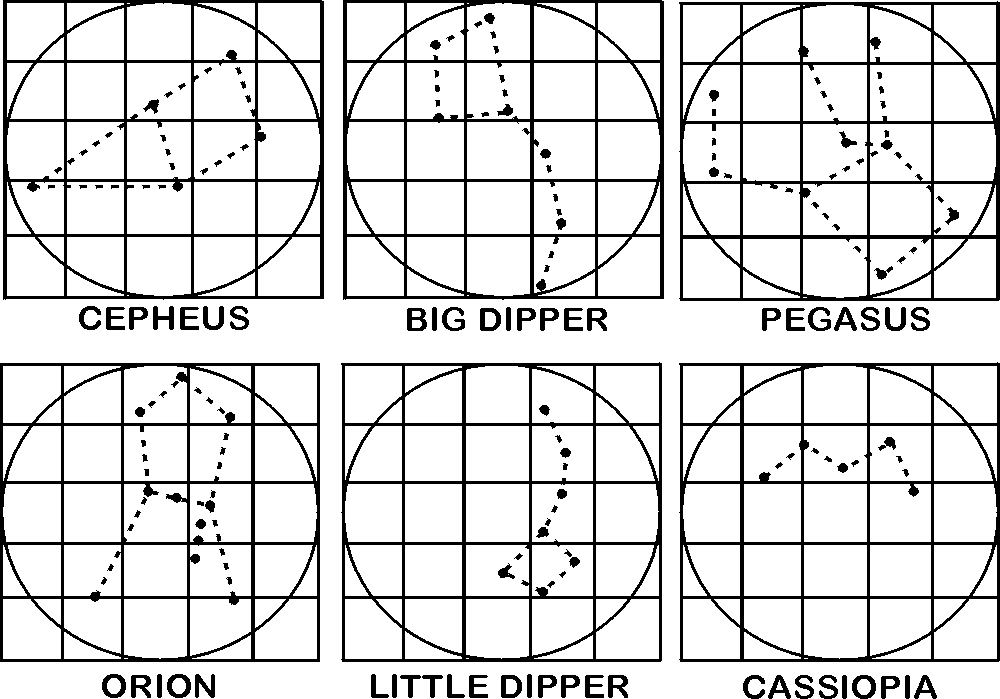
This is a series of pinhole planetariums made from 12 ounce aluminum soda cans with pop tops. Make paper patterns by using the grid method to enlarge constellations below to 2½ inch circles. Note that these star charts are mirror images of how they would look in the sky.  Mark the stars’ positions with pen or dark pencil Tape each pattern on the bottom of a can. Use a small nail to punch tiny holes for stars. Decorate outside of can with contact paper and put constellations name over peephole.
To view constellation, look through peephole toward strong light (not the sun.) For another way to make pinhole planetariums, see page 155, Big Bear Cub Scout Book
Use a star map then to show Cub Scouts where in the sky to look for these constellations.

How do these activities prepare your boys for Boy Scouts
To Project Index
Back to Roundtable


ROCKET PINWHEEL

Description: Construct A Balloon- Powered Pinwheel.
Materials: Wooden pencil with an eraser on one end
        Sewing pin
        Round party balloon
        Flexible soda straw
        Plastic tape
Method:
Inflate the balloon to stretch it out a bit. Slip the nozzle end of the balloon over the end of the straw farthest away from the bend. Use a short piece of plastic tape to seal the balloon to the straw. The balloon should inflate when you blow through the straw.
Bend the opposite end of the straw at a right angle.
Lay the straw and balloon on an outstretched finger so that it balances and mark the balance point. Push the pin through the straw at the balance point and then continue pushing the pin into the eraser of the pencil and finally into the wood itself.
Spin the straw a few times to loosen up the hole the pin has made.
Blow in the straw to inflate the balloon and then let go of the straw.
Contributed by: John Hartsfield, NASA Glenn Research Center
Edited by: Roger Storm, NASA Glenn Research Center

To Project Index

Back to Roundtable

FILM CANISTER ROCKETS
This a fun little den project, a little messy but the kids love it.
Material:
35 mm plastic film canisters. (Fuji brand works best.)
Alka Seltzer tabs
Water.
Fill the canister about 1/3 full with water.
Add a quarter of an Alka Seltzer tab.
Quickly place the lid on the canister, make sure it's on tight and place - lid side down - on a flat surface. Stand back and watch. About 5-10 seconds later the pressure of the released carbon dioxide will blast the lid off and shoot the canister about a dozen feet high. The water splashes about somewhat so it's best done outside.
You can have the boys decorate their canisters to resemble rockets but I have found that the boys mostly look forward to the explosions and how high the rockets fly. If you really want to get elaborate, launch the rockets from inside silos made from sections of mailing tubes or pvc pipe mounted on wood boards. That way the boys can attempt to aim their rockets towards targets.

Extra Alka Seltzer doesn't add to the height very much. Vinegar and baking soda will also work but most leaders report that it doesn't work as well as the Alka Seltzer tabs. I don't understand why but that's what I hear.

You could usually get canisters at no charge from any photo processing shop. As digital photography replaces 35mm film, these canisters will soon dissapear. Hang onto your supply and pass them on to your replacements. Treat them like GOLD. SD cards make lousy rockets.

Bill

MORE IDEAS
We used the plastic containers that Crystal Light lemonade comes in. You take off the wrapper and it's perfect for launching the film canister rockets. They can be reused over and over and over  - unlike toilet paper tubes. Just set the container right on the ground. It will be fine

Sue Carter, Pack 1022
MORE ROCKET STUFF
EVEN MORE ROCKET STUFF
Science Projects
To Project Index
Back to Roundtable


JET POWER
jet powered bottle
Partially fill the bottle with vinegar. Wrap a small quantity of bicarbonate of soda in facial tissue and put it in the bottle. Immediately put the cork in. Lay the bottle on two parallel pencils as shown. When the vinegar and bicarbonate of soda react, they form carbon dioxide.  When the gas builds up, the cork will pop and the reaction will thrust the bottle forward on its rollers.


WINDMILL
Windmill
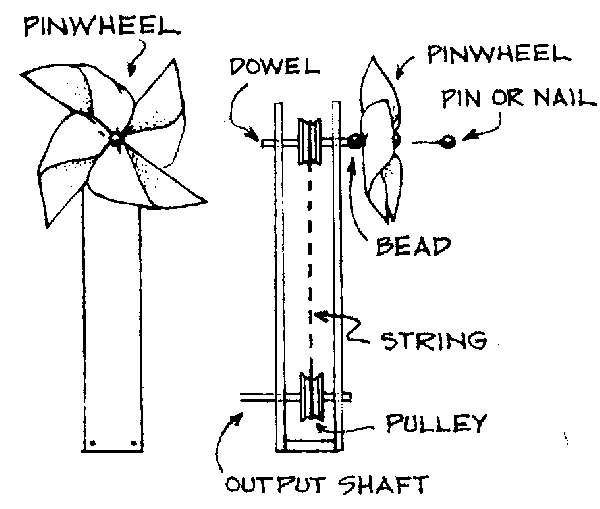
 You will need two small, light pulleys, scrap wood, dowel, string, paper, and pin or nail Use construction paper or poster paper for the pinwheel. Assemble as shown. Demon- strate by blowing fan at pinwheel, showing that this windmill performs work by turning the pulleys. Explain that wind power may soon be an important energy source. For a more elaborate windmill, see page 180 of the Big Bear Cub Scout Book

To Project Index
Back to Roundtable


HELICOPTER
You will need a wooden spool or a length of dowel with a hole drilled through the center, another dowel, a 3 1/2 inch tin can top, and a three foot length of cord.

Cut propeller from can lid with tin snips. 

With nail, punch two holes in center as shown. Put masking tape on sharp edges. Twist all four blades about 20 degrees. 

Helicopter

For the launcher, tap a long nail part way into the dowel and snip off its head. Put the spool on it. Tap two wire brads into the spool in positions corresponding to the holes in the propeller. 

To launch the helicopter, wind two feet of string around the spool, hold it overhead, and pull the string sharply.


JET CAR
Material:
2"x2"x5" box,
9" balloon,
2 straws 2 1/2" long,
1 straw 4" long,
2 wooden dowels 3" long and 1/8" diameter,
4 milk bottle caps,
2 rubber bands,
masking tape,
hammer, and
small nail
jet car
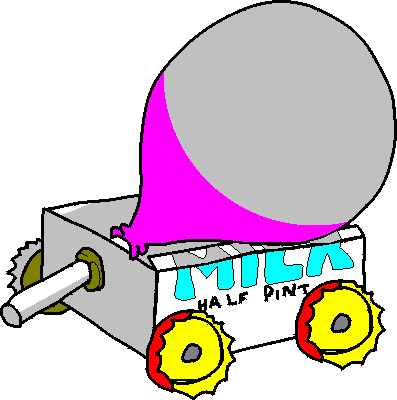
Construction: Tape the two short straws on the bottom of the box to house the dowel axles. Make a small hole in the center of each bottle cap wheel with the hammer and nail. Force one wheel onto each axle. Wheels should fit tightly. Put each axle through a straw on the box bottom and attach the other two wheels. Insert the long straw section into the neck of the balloon about 3/4". Secure with a rubber band. Poke holes in the box so that the straw can be mounted at an angle aiming toward the floor. Secure with a rubber band.

Use: Blow through the straw to inflate the balloon, pinching off the straw to trap the air. Set the car on the floor and let it go.
 

To Project Index
Back to Roundtable
 
CRAZY RACING ROLLER
Materials:
         Colored paper, 
         paste,
         small marble.
Procedure:
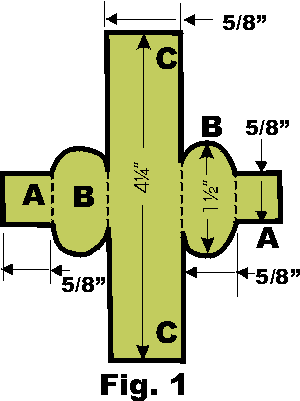
  • Trace design on colored paper and cut it out (Fig. 1).
  • Fold flaps A and B toward the center strip.
  • To form the sides, place flaps A together and paste.
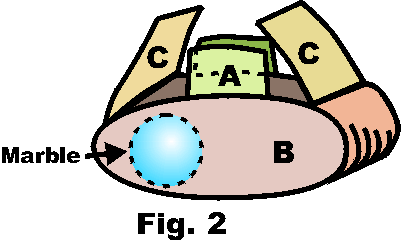
  • Insert the marble between the sides; then paste ends C and D together to form a bean shaped roller with the marble on the inside (Fig. 2).
  • To operate the racer, release it on an inclined flat surface and it will roll down end over end with an erratic motion. Race the rollers against each other 
  • roller-1

    Average time required 20 minutes.

    When roller is used in a racing game, it can be adapted to higher age levels. When using larger marbles, adjust the size of the paper
    pattern

    i Animatics
    roller 2

     
    Another Car Project
    Pack 1421's Marble Car Racer
    To Project Index
    Back to Roundtable
     
    ROLLER BALL
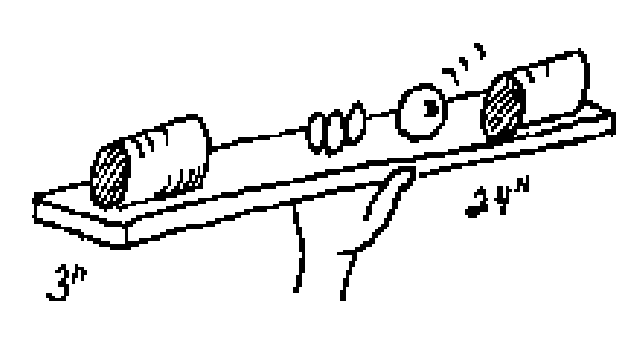
    Materials: Board 3" x 24", 2 cans,
    Ping pong ball

    Cut out and sand the board.  Glue two cans at either end.  To play, hold the board in one hand and roll the ball back and forth.

    Trapper Trails Council
    roller ball


    MILK CARTON BOAT
    Wolf Elective 5g, Bear Elective 7d
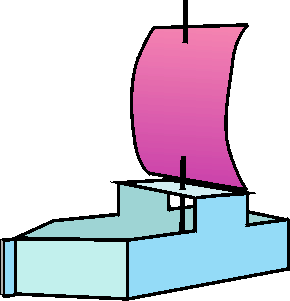
    1. Half a milk carton makes a natural boat. Rig up a sail with two straws and some paper- . . . or . . . Milk Carton Boat
    2. A rubber band motor by slitting two small pieces of milk carton and fitting them together.
    Paddle motor
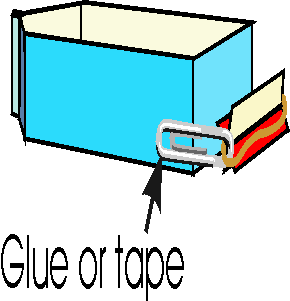
    3. Slip a rubber band across the center and a paper clip at either end. 4. Attach the paper clips to the back of the boat by clipping them to another piece of milk carton glued to the sides. Glue them low so that the paddle wheel sits below the boat in the water and far enough back so that the wheel doesn't touch the boat.
    Rubber Band Motor boat
    To Use: Put the boat in water.
    Twist the wheel and let go.
    What's the fastest boat you can make? Experiment with different types of sails, weights, and rudders to see what controls the speed and direction of sail.
    To Project Index
    Back to Roundtable
     

    ANOTHER VARIATION

    Cut a 1/2 gallon milk carton in half from top to bottom. Punch a hole in the back or stern of the boat. Decorate or paint the boat with permanent markers or acrylic paint. Poke a balloon through the hole leaving the portion that fills with air to the inside of the bent. Blow up the balloon and set the beat in water. Watch it go.


    SOAP POWER
    The surface of any liquid tends to contract. You can use this force to propel a small boat from cardboard or light wood. 

    Put it in a bowl of water and place a tiny piece of soap In the notch. The boat will move. 
    The soap has weakened the surface tension behind the boat and it is pulled forward by the stronger tension in front.
    To Project Index
    Back to Roundtable

     
    TEETER BOARD
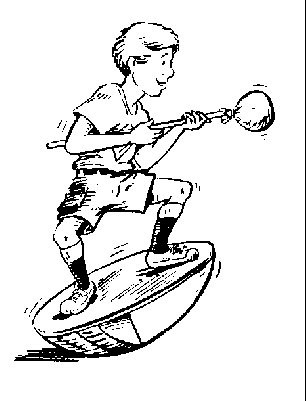
    boy on teeterboard
      JOUSTING


    Make two teeter boards as shown (24 inches in diameter with 4 inch high rockers) from 1/2" plywood. Fasten the platform onto the rockers with wood screws and blocks. 
    Make the jousting poles from plumber's suction cups, soft rubber balls, and squares of cloth, or stuffed socks. Place the boards so that the players are just within reach of each other.


    Teeter Board Plan


    ADJUSTABLE STILTS
    Stilts
    These are good projects where you could enlist some den parents to help
    with the construction. 

    To Project Index
    Back to Roundtable


    HOMEMADE TOP
     
     
    You need eight or 10 paper or plastic plates (nine- or 12- inch diameter), a sharpened pencil, two 1 inch sewing thread spools, and two rubber bands. 

    To avoid leaving a trail of pencil lead marks, you could use instead a pencil thick dowel, pointed at one end by a pencil sharpener.

    Find the exact center of the plates by balancing each one on the pencil's eraser head. Use a knife or scissors to cut small hole in the centers. 

    Homemade Top

    Slip all plates on the pencil and push together low on the pencil. Slip the spools on the pencil above and below the plates. To hold the spools snug, twist rubber bands against them. Decorate top as desired.


    LAUNCHING WITH RIBBONS
    Wrap two 12 inch ribbons, one on top of the other, around the top's axle. Wind until two or three inches remain free.  Keep the top vertical and pull the loose ends of the ribbons in opposite directions to set the top spinning.

    Launching with ribbons


    GENIUS KITS
    The kits are simply paper bags filled with odds and ends.  Each kit, however, must have the same odds and ends.
    Each Cub Scout makes anything he likes with the materials.
     The project might be a space ship or racing car or a construction like nothing on earth. Parents may help but should not stifle the boy's imagination.

    To Project Index
    Back to Roundtable


    Instant Inventor Problems
    This is a series of problems for which dens try to invent solutions. Three sample problems are given below but you can devise others.  As a Pack Activity, run all stations simultaneously, with dens starting at different ones and rotating.  Separate stations as far as possible, so dens can't copy other dens’ solutions. Allow Cub Scout dens 10 minutes at each station, Webelos Scout dens eight minutes.  As a den activity, five your den one problem each meeting.

     
    The quickest way to get a child's cooperation is to ask for the child's help.


    SOAP BUBBLES
    1 quart dish detergent 
    22 gallons water
    1 cup glycerin
    9 parts water
    1 part dish liquid
    2 part glycerin
    4 parts glycerin
    2 parts dish. liquid
    1 part corn syrup 
    (makes tough bubbles! )
    4 drops corn syrup
    1 T. Liquid detergent 
    2 T. water
    Experiment with these four recipes to see which one works best for you. Anything can be used to make great bubbles - straws for strings of bubbles, six-pack rings, funnels, loops of wire, string tied in circles, a Styrofoam cup with a hole punched in the bottom to blow through. Just be sure when mixing the solution that you mix gently


    POSTAGE STAMP NECKERCHIEF SLIDE
    Materials: One postage stamp, one piece of lightweight wood, one piece of 2-by-2-inch PVC pipe, paint, glue

    Choose a new or canceled postage stamp. Cut a piece of thin wood (about 2 inches larger in diameter than the stamp). Paint the wood a color that will look nice with the stamp. Glue the stamp to the front of' the wood. When dry, paint over the stamp with white glue to give it a shiny effect and to protect it. Attach the PVC pipe to the wood.

    To Project Index
    Back to Roundtable

    UNCLE SAM WINDSOCK

    Curve the ends of a half sheet of white poster board back until they overlap slightly Staple the ends in place. Paint or draw vertical stripes in red around the top half. Glue a dark blue paper strip around the  middle of the cylinder, covering the ends of the red stripes.

    Draw a face on the bottom half of the cylinder Red, white, and blue streamers can be glued to the  inside of the bottom of the cylinder. For the hat rim, cut a blue circle larger than the cylinder's diameter. Center the cylinder atop the circle, draw the outline of the cylinder's diameter onto the blue circle, and then cut that outline from the interior of the blue circle. Slide the resulting blue "loop" onto the cylinder and tape in place. Uncle Sam Windsock

    PARADE WAVERS
    Fold a red paper plate in half. Glue one large blue and one large white star cut from construction paper onto the front and the back of the folded plate.
     Glue about 2 feet of red, white, and blue crepe paper streamers to the inside of the folded plate, alternating colors. These streamers should be glued near the center of the inside fold so that they remain secure while waving. Staple or glue the unfolded edges of the plate together. Attach a tongue depressor or paint stick for a handle by gluing one end of the stick to the backside of the plate Flag Waver
    To Project Index
    Back to Roundtable
    .
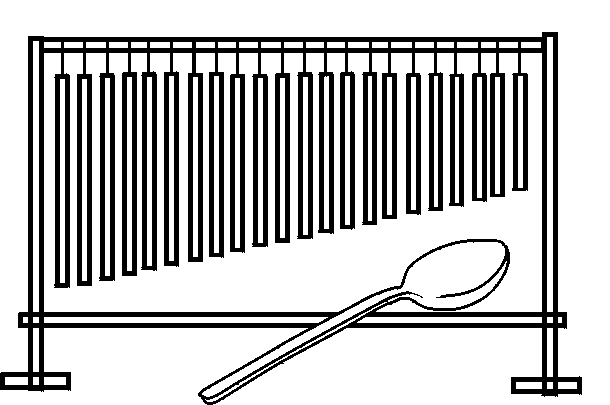
    PIPE CHIMES
    Get two 10 foot lengths of inch galvanized conduit pipe. Cut the pipe to exact measurements shown (8 inch off will change the pitch). Drill a hole for string 1X inches from the end of the pipe. (For best results, use a drill press.) You may build a frame to suspend the pipes, or players may hold them individually in the air, so that they are free to vibrate when played.
     For best results, use a spoon to strike the pipes, and strike in the center of the pipe.
    Musical Chimes

    The following chart will show you which note will come from each length of pipe. Number your pipes accordingly.


    Pipe #
    Size (in.)
    Note
    Pipe #
    Size (in.)
    Note
    0
    13 3/4
    A
    11
    9 7/8
    Ab
    1
    13 3/8
    Bb
    12
    9 5/8
    A
    2
    13
    B
    13
    9 3/8
    Bb
    3
    12 5/8
    C
    14
    9 1/8
    B
    4
    12 1/4
    C#
    15
    8 7/8
    C
    5
    11 7/8
    D
    16
    8 5/8
    C#
    6
    11 1/2
    Eb
    17
    8 3/8
    D
    7
    11 1/4
    E
    18
    8 1/8
    Eb
    8
    10 7/8
    F
    19
    7 7/8
    E
    9
    10 5/8
    F#
    20
    7 5/8
    F
    10
    10 1/4
    G

    Play "America" on your newly created pipe chimes. Use pipes 3, 5, 7, 8, 10, 12, 13, 15, and 17. Pipes listed atop each other are played simultaneously.
     

    8     8    10    7    8   10          12   12   13   12   10   8
    3     3     5     3    5     7           8     8   10    8     7

    10    8     7    8          15   15   15   15   13   12
    5      3     3    3          12   12   12   12   10    8

    13   13   13   13   12  10        12   13   12   10    8   12
    10   10   10   10    8    7          8     8          8           8

    15   15          17   13   12    10   8
     7     8            8   10    8      7
    To Project Index
    Back to Roundtable
     
     
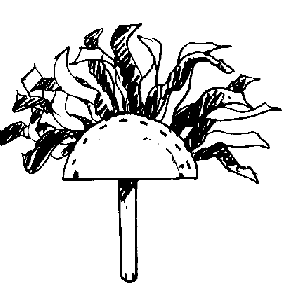
    DRUMS
    DRUMS


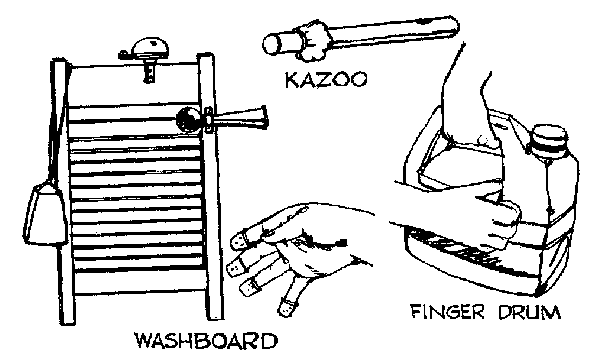
    NOISEMAKERS
    Various Noisemakers
    Your Cub Scouts may want to add to the din with these instruments.  Use thimbles to play washboard. For even more noise add bike horn, bell or whistle. Kazoo has waxed paper over end of mailing tube fastened with a rubber band. Cut small hole near other end and play by humming Into open end. For finger drum, use a small plastic bottle.
    To Project Index
    Back to Roundtable

    CUBS IN THE KITCHEN:
    Preparing him to become a Boy Scout

    WHY CUBS COOK


    FUN FOOD

    Sea Foam Gelatin
    2 large packages of Berry Blue Gelatin Gummi Fish

    Mix gelatin up according to the package, in a clear "gold fish" bowl.  Chill in the fridge until the gelatin is thickened, but not solid.  Stir in gummi fish.
    Tropical Island Slush
    5 Cups water
    4 Cups sugar
    One 12 ounce can frozen orange juice concentrate
    One 46 ounce can pineapple juice
    5 mashed bananas
    Two liter bottles of lemon-lime soda
    Bring the water and sugar to a boil.  Remove from heat and cool.  Add juices and bananas.  Freeze.  Take out of the freezer two hours before serving.  Serve with two 2 liter bottles of chilled lemon-lime soda.

    Submarine Sandwiches
    Loaf of French bread, sliced meats, sliced cheeses, sliced fresh vegetables, Italian dressing
    Cut French bread in half.  Layer on meat, cheeses, and vegetables.  Sprinkle with Italian dressing.  Cut into individual portions.

    Trapper Trails Council, BB
    DIXIE CUP COOKING
    Yes, I know it sounds crazy!! I said the same thing! The cups do not burn--trust me! The cookbook I use is called "Cup Cooking" by Barbara Johnson. It is distributed by Gryphon House, Inc. The recipes are done for individual child prep, so all kids can participate in all parts of the work. The Dixie cups referred to are the 5 oz wax coated paper cups.  And these are all cooked in a covered electric skillet. Of course, Safety reminders are made to the kids. So here goes...some of the favorites:

    Gingerbread
    3 T gingerbread mix
    1 T water
    Put mix in cup. Add water. Stir well. Bake in electric skillet at 400 degrees 15 minutes or until done.

    Instant Pudding
    2 T instant (not cooked) pudding mix
    2 T dry milk
    1/3 C water
    Put pudding mix and milk in cup. Stir well. Add milk and stir for 2 minutes. Cool in refrigerator.

    Peanut Honey Balls
    1 T peanut butter
    1/2 t honey
    1 1/2 t powdered milk
    Put peanut butter in cup. Add honey and then milk. Mix well. Roll into balls. Crush 5 Wheat Chex with rolling pin (I put them in a Ziploc bag & smash them). Roll balls in crushed Chex.

    Laura Rosecrans, Marquette Heights, IL. droserans@ntslink.et
    To Project Index
    Back to Roundtable
    ELECTRIC SKILLET COOKING
    Cheesy Wiener Wheels
    Spread small amount of tomato paste on a Ritz cracker.
    Cut slice of cheese into 1/4's. Place piece of cheese on cracker. Slice wiener into fairly thin circles. Place wiener slice on cheese.
    Put on foil in electric skillet at 350 deg. until cheese melts.

    Baked Apples
    Cut 1/2 apple crossways and then core.
    Place apple cut side down in oiled skillet
    Put 5 raisins in hole of apple.
    Pour 1 t sugar in hole.
    Sprinkle 1 pinch cinnamon in hole.
    Pour 1 T water to side of each apple.
    Cover skillet. Bake until soft at 350 deg.

    Laura Rosecrans, Marquette Heights, IL. droserans@ntslink.et,
    FORTUNE COOKIES
    To make fortunes for cookies, cut 4- by 1/2 inch strips of paper and write or type your own fortunes with non-toxic ink. Because you must work quickly to shape the cookies, it's best to make them one at a time. Using more than one baking sheet is also helpful because you won't have to waste time waiting for the baking sheet to cool. A liquid measuring cup or deep heavy bowl is a good tool for shaping the cookies.
    1 large egg white
    1/4 cup all-purpose flour
    1/4 cup sugar
    1/4 cup finely chopped sliced almonds
    fortunes
    Preheat oven to 400°F. and butter a large round area (about 6 inches) in middle of a baking sheet.
    In a small bowl whisk egg white just until foamy. Add flour, sugar, almonds and a pinch salt and beat until smooth. Put 2 teaspoons batter on buttered area of baking sheet and with back of measuring spoon spread batter evenly into a round about 3 inches in diameter.  Bake cookie in middle of oven until golden around edge but pale in center, about 5 minutes. Working quickly, with a spatula remove cookie from baking sheet and invert onto a work surface. Put a fortune in middle of cookie and fold cookie in half. Bend pointed edges of cookie toward each other and hook them onto rim of a liquid measuring cup or deep heavy bowl to cool completely.  Make more cookies with remaining batter in same manner, letting baking sheet cool between cookies. Cookies may be made 3 days ahead and kept in an airtight container.  Makes about 8 cookies.
    CHEESE APPLAUSE
    Grate, grate, grate…
    To Project Index
    Back to Roundtable

    BIRD CAKE

    Materials:
    Wild bird seed
    1/2 pound suet
    12 ounce juice can
    Long piece of wire (such as telephone)
    Piece of vegetable (onion or potato)

    Cut vegetable sack to fit inside can top with extra sticking up above can top.
    Cut suet into small pieces and heat in double boiler so it won't burn.  Let cool and harden.  If any pieces of meat are seen, remove them.
    Reheat suet.  After it has melted again, mix in one cup birdseed.  Pour this mixture into can.  Cool until it hardens.
    To remove bird cake from can, set can in warm water.  Carefully run a knife around inside to loosen sack.  Pull top of sack to get cake out.
    Tie ends of sack with wire, leaving enough wire to tie to tree limb.  Hang as far out from trunk as possible to keep it from squirrels.


    FUN FOOD

    QUICK PEANUT BUTTER FUDGE

    For each Scout:
    1 1/4 Tbsp margarine 2 Tbsp Karo red label syrup (light)
    1 1/2 Tbsp Peanut Butter (creamy or chunky) 1/4 teaspoon vanilla
    1/8 teaspoon salt 1 cup plus 2 Tbsp confectioners sugar
    2 Tbsp chopped nuts

    Blend margarine, corn syrup peanut butter, salt and vanilla in mixing bowl.  Stir in confectioners sugar gradually.  Turn onto board and knead until well blended and smooth.  Add nuts gradually, pressing and kneading into candy.  Press out with hands into square 1/2 inch thick.  Cut into serving pieces.  Makes 1/2 pound fudge per scout.
    Make for fun or make as gift for parents.  Wrap in saran and decorate with ribbon or make a special decorated boy or candy dish to put fudge in.  Remind scouts to refrigerate once the gift is taken home.

    Northwest Suburban Council
    COMPUTER VIRUS SNACKS
    Serve crisp rice cereal treats or plain cup cakes. Decorate with frosting, raisins, gum drops, red-hots, and/or M&Ms to look like computer viruses. Serve brownies or square cookies. Decorate with above materials to look like floppy disks.
    As an alternative to Design Your Computer (above), provide graham crackers, frosting, and candies, and have boys build their own "eatable computers" similar to gingerbread houses.
    Make fruity popcorn. Requires 8 cups fresh, hot popcorn; 1/3 cup melted butter or margarine; 1 package Jell-O (any flavor). Put popcorn into a large paper sack, pour in margarine or butter, close bag, and shake well. Open bag and sprinkle in sprinkle in Jell-O. Shake well and serve.
    KITCHEN EXPERIMENTS
    Make Your OwnMagicRainbow
    Milk is the main ingredient in this exciting science trick. It will entertain you with a swirling display of colors and patterns that will last for several minutes. You can repeat this trick many times, and each time the results will be different. Just like a kaleidoscope, the design will change right before your eyes.
    Materials needed: a shallow dish or pie plate, one cup of whole milk, food coloring (red, blue and yellow or 3 colors of your choice), a few drops of liquid dish detergent.
     Pour the milk into a shallow dish and let it sit until it has warmed to room temperature. (The experiment will not work quite as well if the milk is cold.) Squeeze several drops of food coloring into different areas of the dish. Alternate colors for best results.
     Hold the bottle of liquid dish detergent over the dish and squeeze gently so that a few drops of detergent will drip into the milk.
     Like magic, the milk will start churning and swirling, mixing the colors into beautiful designs. The swirling will continue for about 5 to 10 minutes, gradually slowing down. Adding a few more drops of detergent will make it last longer.
     Explanation: This experiment works because the detergent will not mix with the milk, so it "pushes" the milk out of the way, causing it to swirl.  swirling action mixes the food coloring to make the rainbow of colors.
    One final reminder: When you have finished the experiment, dump the rainbow milk down the sink drain so no one drinks it.
    To Project Index
    Back to Roundtable


    BUTTER CHURN
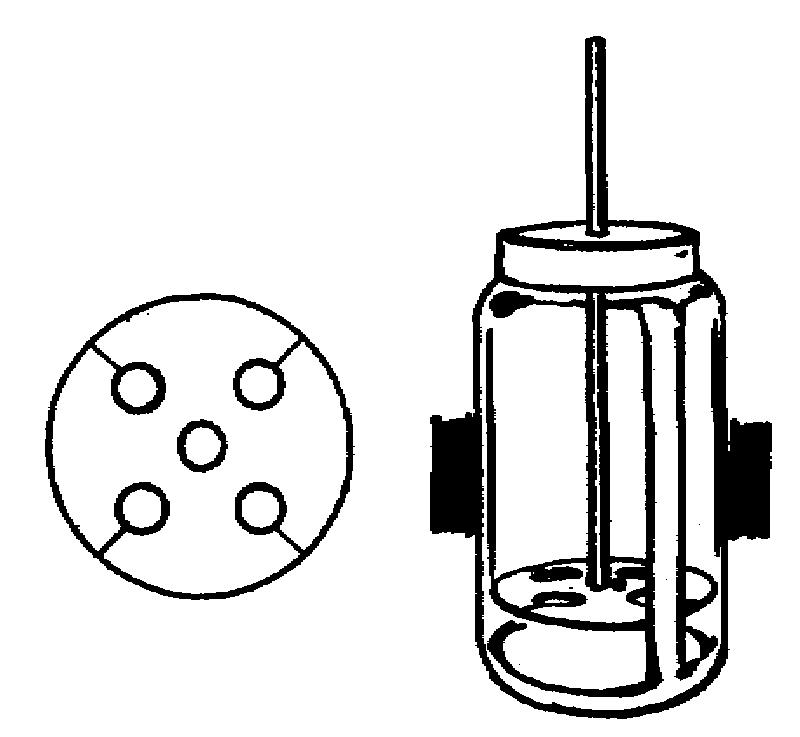
    Use pint glass jar with metal top. Cut dasher from piece tin can and fasten to dowel with small nails above and below it. 


    Butter Churn
    MAKING BUTTER
    A half-pint of whipping cream will make one third cup of butter. Put cream in the churn. Let the boys take turns moving the dasher up and down. After 20 to 30 minutes, butter will begin solidifying on the dasher. Shake until the small bits form one larger piece. Pour off the buttermilk.
    With a wooden spoon, stir and press butter to remove excess water. Rinse butter with tap water to remove more water and keep the butter from tasting sour. If the finished product is too sweet, blend in a pinch of salt


    Kitchen Chemistry
    Check this out: OOBLECK
    Named after the stuff in Bartholomew and the Oobleck by Dr. Seuss, this stuff is weird. Is it a solid? Is it a liquid? Who knows?
    Preparing him to become a Boy Scout

    Foil Cooking Hints


    How about a March cook-out with your den?  This is real Scouting stuff! It will take a bit of planning, some extra parent help and some luck with the weather, but it will be worth it to the boys.

    FOIL COOKERY HANDBOOK

     Use two layers of light-weight, or one layer of heavy duty  aluminum foil. Foil should be large enough to go around  food and allow for crimping the edges in a tight seal. This will keep the juices and steam in. This wrap is know as the
    Drugstore Wrap
     Use heavy foil three times the width of the food. Fold over and roll up the leading edges. Then roll sides for a steam proof seal.

     A shallow bed of glowing coals that will last the length of  cooking time is necessary.
     Cooking Times:

    • Hamburger: 8-12 minutes,
    • Carrots: 15-20 minutes
    • Chicken pieces: 20-30 minutes,
    • Whole Apples: 20-30 minutes
    • Hot dogs: 5-10 minutes,
    • Sliced potatoes 10-15 minutes


    FOIL DINNER
    Lay slices of potatoes, onion, and carrots on a sheet of heavy-duty foil then place hamburger patty on top. Cover with slices of potato, onion, and carrots. Season with butter, salt and pepper. Cook 20-30 minutes over hot coals, turning twice during cooking.

    Jess Olonoff, With Thanks to The Indian Nations Council Pow-Wow  Book
    Baked Apple - Core an apple, and place it on a square of heavy-duty aluminum foil. Fill hole with raisins, brown sugar, and a dash of cinnamon. Wrap foil around apple and bake over hot coals for 10 minutes.
    George Rogers Clark Council Pow Wow
    CINNAMON SIPPIN' CIDER
    [ Serve after an outdoor activity]
    In a saucepan combine 3 cups apple juice, 1 cup cranberry juice cocktail, and 8 inches of stick cinnamon.  Bring to a boil and simmer uncovered for 5 minutes.  Remove cinnamon.  Serve warm or chilled.  Makes four 8 oz. servings.
    BB
    To Project Index
    Back to Roundtable
    Bannock
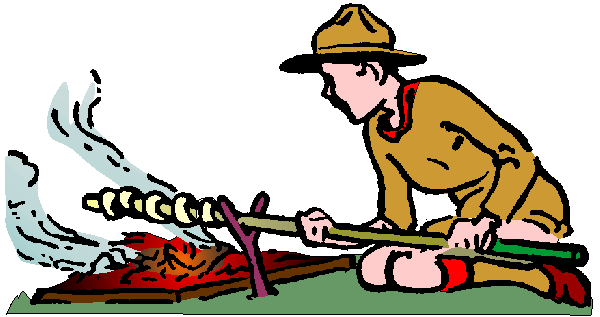
    Bannock was the staple scone type bread made by settlers and trappers over open fires.  BREAD ON A STICK
    Made properly, with the addition of butter/margarine and fresh berries or preserves, along with a hot cup of Earl Grey tea, served in the middle of the bush, just   this side of nowhere, can make even the most up-tight Scouter almost mellow. 
    Scouter Jim's Bannock
    1 1/2 cups all purpose flour
    1 tbs. baking powder
    1/2 tbs. granulated sugar
    1/2 tsp. salt
    1/4 cup margarine or butter
    1/2 cup water (almost)
    Mix all dry ingredients together, making sure that all are mixed well. Cut in margarine or butter, using a pastry knife. Place result in a sandwich sized Baggie. 
    At the campsite, pour out dried ingredients into bowl. Add enough water to make a soft dough. Bake dough carefully until golden brown, using mess kit pot with a handle and lid. 
    Makes enough to split evenly between one Scouter and one Scout. To avoid incessant whining by the Scout about him not getting his 'fair share', ensure that the Scout has his own Baggie of bannock, thereby making the portion that the Scouter has to consume a lot larger, making him a lot more happier and a lot more mellow. 

    Substitutions for Wussies: 
    Liquid: Milk is the best substitution for the water in this recipe. It does make a difference in the flavor and texture of the bannock. Next best substitution is a water/powdered milk combination. 

    Campfire: Lacking the ability to build a campfire in the middle of your kitchen, you can bake this recipe at 425 degrees F (220 degrees on the 'other' scale) for about 20-25 minutes. Top should be lightly browned to achieve some sort of mellowness when consuming. 

    Other Methods of Making Bannock: 

    On a Stick or Twist Method: 
    Ensure that the fluid added just makes a ball of almost sticky dough. Roll the dough into a long, flat rope. Spiral the dough around a green stick and place over camp coals.  Remove all embers and ashes before consuming. Remember that Scouts do not cut green sticks from living trees. 

    In a Pan: 
    Add more fluid to the dry mixture, and flatten out. Place in a frying pan over hot coals. Cooks much similar to a doughy pancake.

    In aluminum foil: 
    Use at least two layers of foil. Before you add the dough to the foil, make sure that you add butter/margarine to the foil. Fold the foil around the dough, leaving room for expansion. Place near hot coals, turning occasionally. 

    Other sources of Bannock information: 
    Morton's Recipe Collection: Bannock here Aboriginal Tourism Authority's
    Bannock Jackie Naigle's First Nation Bannock
    Sigurd F. Olson's Bannock 

    © Copyright 1998, by Jim Speirs. All Rights Reserved. You may use this information in your program, distribute it as training materials, or any other free distribution to Scouters, as long as you don't accept paid advertising or commercial financial support, without written permission of the author.
     Jim Speirs.
    Jim Speirs' Web site has been retired. Jim, a Canadian Scouter was a special source for outdoor knowledge and inspiration. We will miss him.

    Twixer Biscuits
    Open a Bisquick box, and make a depression in the contents so that you can pour a little water into the hole.   Stir it gently with "twixer" (clean, pronged stick) until it forms an egg-sized ball.  Remove ball of dough from twixer, flatten it, and twist it around a pre-heated stick.  Hold over coals until browned and cooked through. Or, you  may make a depression in the dough and fill it with jelly or cheese. Wrap with foil, and bake over coals for 10 minutes.
    George Rogers Clark Council Pow Wow
    To Project Index
    Back to Roundtable

    CAMP STOVES AND OVENS
    BUDDY BURNERS & HOBO STOVES
    Are you familiar with "buddy burners" ?  You take a big can, like a coffee can.  Cut a door in the bottom, maybe punch some hole along the top with a can opener (the kind that make a triangular hole).   This makes the grill.  (so you would turn the can upside down and cook on the original bottom of the can.
    For the burner, take corrugated cardboard and cut into strips and pack into a tuna can.  Then fill with paraffin wax.  The cardboard acts as a wick to burn the wax.  Light the burner, slide it under the larger can.  Great for burgers.  There are some web pages out there that will show this better.  Also you can use a can lid and wooden clothespin to put over the burner to control the heat.  Spray oil on the "grill" before using.
    CT-Jim Lindberg
    The Cub Scout How-To Book has Buddy burners and tin can stoves on page 3-26 and 27.   And you can carry your How-To Book into the woods when you go there!
    A Buddy Burner Breakfast!
    Beat 3 eggs in a bowl.
    Add 1/8 c milk.
    Set aside.
    Using two slices of bread, make a peanut butter sandwich.
    Dip the sandwich in the egg mixture and toast lightly on greased buddy burner. When browned, flip over and toast the other side.  You can add banana slices to the sandwich before toasting.
    Kathy Brown, Pathfinders, Newport, Nova Scotia, Canada


    Eggs on a Raft - Grease the cooking surface of stove. Cut two-inch diameter hole in a slice of bread. Place bread on burner and break egg into the hole. Season and turn over once While cooking.

    Bacon and Eggs - Fry bacon on hobo stove; add one or two eggs and fry until done.

    Hot Dog Delight - Wrap a slice of bacon around wiener, pinning with tooth-picks. Fry on hobo steve, or broil on a stick over hot coals.

    George Rogers Clark Council Pow Wow

    Buddy Burner FAQ's
    Q About how much Paraffin wax do you think I will need for say a dozen or so Buddy burners?
    A We had bought 2 1-lbs boxes of paraffin, we filled about 10 sawdust filled large cat food cans. It really makes a difference on how much space is taken up the corrugated paper or sawdust.


    Q What is the best thing to use for the wick? The book says string wick? Is this just string?

    A We used bailing twine, dipped in paraffin to water-proof it.  Then added to the container as it was filled with paper/sawdust.
    Remember to cover up the wick with wax, to water proof it.  But make it visible and close to the surface to dig it out of the mass of wax.


    Q and do you put more then 1 wick? The book shows one, but I think I read elsewhere 2 or 3?

    A Multiple wicks will start the surface burning faster.  Sounds like a good idea.
    Jay Bemis, CM Pack 28


    To Project Index
    Back to Roundtable


    Buddy Burner Links:
    Back to Index
    Back Home
    Back to Camping


    REFLECTOR OVENS
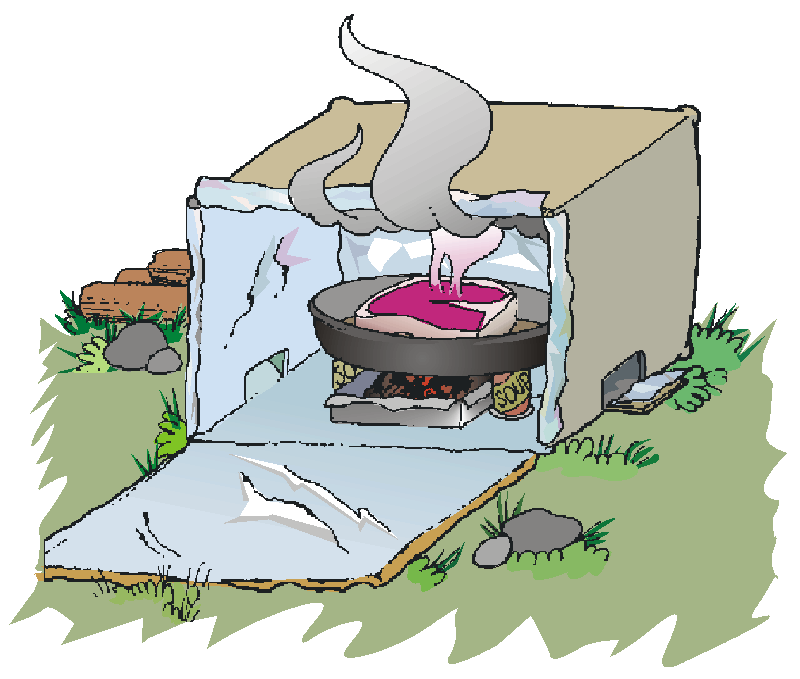
    This makes a good den or family project before a pack overnight or other outdoor activity. I'm not sure about the porterhouse though.
    box reflector oven STEVE'S METHOD
    I'll be cooking biscuits this weekend in my box oven. I used a double layer of foil, metal tape, and a STURDY box. I use charcoal to power it and have no problems. 
    Start the charcoal on a grill and then when they are gray, place them in the oven in a foil tray so the bottom is protected..  This will be it's 4th outing and looks as good as the day my son and I made it.

    JUDY'S METHOD
    My version of a box oven is one where the fire (charcoal) goes on foil on the ground, not inside the box. I have baked mini pizzas, brownies, etc. in what we call the box oven.  Procedure is:

    1. Line box with heavy duty foil (no cardboard showing).
    2. Lay heavy foil on ground.  Place four empty cans (soda cans work well) inside the four corners, so that the pan will set on them.
    3. Prepare your food and place in pan or on cookie sheet.  Place enough evenly spaced charcoal briquettes on the foil to equal the specified oven temperature.  There is some difference of opinion on the temperature value of one briquette, but we use the formula that each briquette is 25 degrees.
    4. Place pan or cookie sheet on top of cans.
    5. Turn foil lined box upside down over the entire thing.  Find four sticks a little larger than a pencil and place one under each corner of the box so you have about 1/4 inch of space between the box and ground.
    6. Cook for specified time.  Remove box and enjoy.
    Of course some people like to get fancy and use coat hanger wire to put a shelf in the oven, a pan in the bottom for the charcoal and a lid that's adjustable for air flow, but that's a lot more work than the above and doesn't yield any better results.
    CT-Judy Yeager
    CHIP'S WARNING
    Maybe part of my problem was that I started the fire in the box from scratch instead of placing already hot charcoal started from a grill. Out of 7 boxes that I lined with foil only 2 did not catch fire and burn.
     

    ICE CREAM IN A BAGGIE
    Using basic materials and ingredients [ice, milk, eggs, granulated sugar, rock salt, flavoring, spoons, cups, napkins, and plastic bags] we made ice cream.  Then, role-playing as budding student-scientists, we investigated this ice cream and the commercial product.  Here are the instructions for making ice cream:

        Pass out two zip loc bags to students, one small and one large.  Have them fill to 1/2 capacity the large bag with crushed ice and then add in the large bag six (6) tablespoons of rock salt on the ice.

        In the small bag, they should put in one (1) tablespoon of sugar, 1/2 teaspoon of vanilla flavoring and 1/2 cup of milk.  Secure the zip loc bag and place the small baggy inside the large bag.   Have the students shake the baggies for 5-10 minutes until the ingredients begin to gel.

        They can add cookie crumbs, chocolate syrup, fruit, etc. at this point to the ice cream

    For additional information see these websites:

    Renee Robinson [ST Galasius School] Handout:  The Science of Ice Cream/ Kitchen Chemistry


    Back to Index
    Back Home
    Back to Camping


    NATURE PROJECTS
    Your den's activities will depend in part on where you live - the kinds of flora and fauna that grow there and how advanced springtime is in your area. Wherever you are, there should be plenty to see, hear, and smell in the outdoors.
    For many other ideas, see Chapter 8, “Nature and Outdoor Activities,” in the Cub Scout Leader How-To Book. You will also find nature related activities in the Wolf Cub Scout Book (Achievements 6 and 7 and Electives 13, 15, 18, and 19) and in the Bear Cub Scout Book (Achievements 5 and 6 and Electives 2, 12, and 15).

    Nature Rambles and Hikes - A short nature ramble in the backyard or a playground is suggested for the first den meeting and a longer hike for the third meeting. On both occasions, encourage the boys to look, really look, at what they see outdoors every day. Each boy should carry a container to collect such simple things as a blade of grass, an acorn or other nut, a seed, old leaves, dead insects, twigs, interesting small rocks. When you get back to the meeting place, use field guides to trees, insects, birds, and rocks to try to identify their prizes. Also try to answer such questions as:

    • What animals eat acorns?
    • What do buds on trees become?
    • What is the purpose of a leaf?
    • Where do ants live?


    NATURE PROJECT

    Discover how insects and spiders survive the winter
    You Need:
  • Warm clothes and a nice day
  • flashlight,
  • magnifying glass (helpful but not necessary)
  • large glass jar or milk carton,
  • potting soil,
  • cheesecloth or old nylon stocking
  • rubber band,
  • knife or pruning shears.

  • What to do:
    Go outside. Look into crevices in bark, in and under dead logs, piles of leaves, clumps of grass, shingles, around windows, in cracks between bricks, in attics, basements, garages, and any place that provides shelter.

    Use your flashlight and a stick for probing. Can you find active and hibernating adult insects, eggs, and cocoons?

    Try to leave things as you found them.

    Try to find a gall on a tree or shrub. Collect several different types. While still outside, cut them in half and observe what is inside.
    You can keep galls to see what emerges in the Spring. Cut a 4-6" section of a twig with a gall.

    Put a layer of potting soil into a jar, or a milk carton with holes cut in two sides. Put one end of the twigs into the dirt. Cover the jar with cheesecloth or stocking secured by a rubber band, or slide the milk carton into a stocking and tie the ends. Moisten the dirt occasionally. Keep the galls outdoors, out of direct sunlight.


     To Project Index
    Back to Roundtable


    PRINTING LEAVES
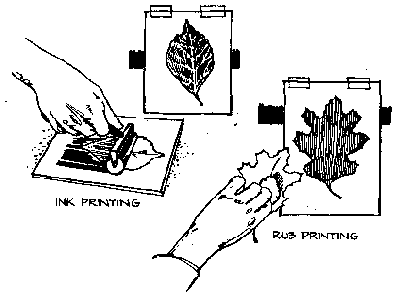
    Leaf Printing To ink print a leaf, place it on a glass plate and roll small dab of printer's ink over it. Then place leaf ink side down, on white paper, cover with newspaper, and run roller over it. For a rub printing, use wad of cotton to rub leaf with graphite or colored chalk. Place paper over the leaf and rub it with another wad of cotton. To fix the print, spray with a fixative from an art supply store.
     
     
    GREAT BUG HUNT
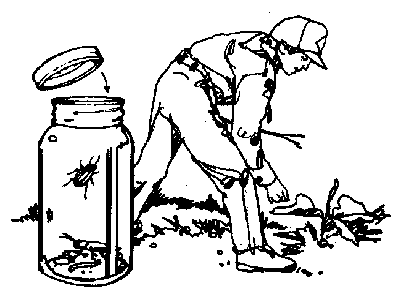
    Each Cub Scout has a jar with a mesh cover or screw-on lid with holes punched in it for ventilation.  Bug Hunt
    On signal, they capture as many living creatures as they can find - worms, spiders, ants, grasshoppers, beetles, and other Insects. After 10 minutes, count what they have caught and have the boys release their captives.
    TREE BARK RUBBINGS 
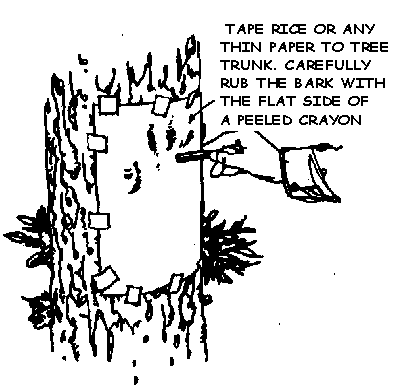
    Bark Rubbings You can make interesting patterns with rubbings of smooth bark trees by the same method used for gravestone rubbings. .
    Tape rice paper to the tree and carefully rub with the side of a crayon. The technique works best on bark of birch, slippery elm, butternut, and wild cherry.

     
    BEETLE TRAP
    Sink an empty tuna can to the rim in the ground and put bits of meat or fish in it. Beetles will tumble in and not be able to climb out. Beetle Trap

    To Project Index
    Back to Roundtable


    SMALL GREENHOUSE
    Learn to grow and care for plants by making a terrarium.  It is a little garden sealed in a glass container.  Rich soil and moisture inside the jar make the garden grow quickly.  In planting your garden, use wild ferns, violets, moss, and small cuttings of ivy or any houseplant that will grow in water.
    Materials:
    A clear, wide mouth 1 gallon glass jar and lid (ask at your neighborhood grocery, restaurant, or delicatessen for an empty pickle jar.)
    Sand or bird gravel
    A piece of burned wood or some charcoal
    About 2 cups of rich garden soil
    Plywood, 12" x 8"
    Strips of wood 1/2" thick and 1" wide
    Thin brads or nails
    Hammer, saw & sandpaper
    Paint or stain, if desired
    Variety of small plants

    Build the base for the garden
    Five pieces of wood are used to make the base.  The base measures 12"x 8".  Set up as a rectangle the smaller pieces of wood, squaring it on the on the base.  This is where your jar will fit.  Two of the pieces are 6" long and the others are 5" long.  Nail these to the base, sand the inside of this rectangular to make the jar fit snugly within it.
    Place the jar, thoroughly clean, on its side on the wooden base.
    Put a 1/2" layer of sand or bird gravel in the bottom of the jar as it lies on its side.
    Crush a piece of charcoal o r burned wood between newspapers and sprinkle a layer of charcoal over the sand.
    Add a layer of rich dirt.  The garden can be higher at the backside of the jar, but be sure the dirt is smoothed away from the mouth of the jar so that it will not spill out.
    Set your plants at least an inch deep in the soil.
    Spay the garden with water.  Do not get dirt to wet.
    Seal the jar with the lid and set the tiny greenhouse in a spot where it will get some sunlight each day.
    Watch the garden carefully for a day or two.  If it appears to be too wet, take off the jar lid for a day or more until the garden dries some.
    The garden will grow for 2 or 3 months without having to be opened.

    BB - Indian Nations Council


     A KID'S GUIDE TO BIRD WATCHING


    Texas Parks and Wildlife
    There are many different kinds of birds. They can be told apart by the shapes of their bodies, the color of their feathers and the places where they live. Let's take a look at each one of these and how to use a field guide.

    To Project Index
    Back to Roundtable


    PLACES TO GO
     
    LOCAL DUMP - learn about producing less garbage, recycling, reusing resources.

    SEWAGE TREATMENT CENTER (a.k.a. Palo Alto Water Quality Control) for Bear Cub Scouts and above

    BFI San Carlos (recycling) - to work towards their Conservation Badge

    Resource Revival, 2267 North Interstate Avenue, Portland Tel: 800-866-8823 Since 1994, our award-winning designs have saved over 100,000 pounds of used bicycle, automobile, and building parts from landfills. We make everything by hand in Portland, and delight in the way our unique materials make each piece as individual as the artists who create them

    AUDUBON HOUSE  5151 NW Cornell Rd., Portland. - (503) 292-6855.  Nature Center and Store hours: Mon.-Sat. 10am – 6pm, Sunday 10am – 5pm.  Hiking, Bird Sanctuary, Nature Center, Classes, Wildlife Care Center, Conservation Advocacy, Nature Store, Field Trips, Guided Sanctuary Tours, Volunteer Programs.

    BONNEVILLE FISH HATCHERY:   Exit 40 on 1-84. (503) 374-8393. Daily 7:3O - dusk. Free. Check out the Free Fishing Weekend held annually in early June. Great for beginning anglers.

    CRYSTAL SPRINGS RHODODENDRON GARDEN: SE 28th Ave., North of Woodstock Ave. - (503) 777-1734 Open March through June. Nearly 1000 varieties of rhododendrons and azaleas. Free Tues. and Wed., $2/person other days but if you call ahead you may be able to get the charge waived for Cub Scouts if you can't get there Tue. or Wed. Open dawn to dusk. This is a walking tour and not a park to run around in. Buy cracked corn there to feed the ducks.

    HOYT ARBORETUM:    4000 SE Fairview Blvd., Portland (503) 823-3655  Open dawn to dusk. Guided tours 2pm Sat. and Sun. For groups please call ahead for reservations. Free admission. Self-guided tour books available with 10 miles of trails. This is a walking tour, not a place to run around in

    OXBOW PARK:  Wood Village Exit 16 off I-84 in Gresham. Go south to Division Street. Turn left, and continue to Oxbow Parkway. 1,000 acres of dense forests, grassy clearings, sandy river frontage, and sheer  canyon walls. Old growth forest alone covers 180 acres.


    AUDUBON SUGGESTIONS
    Hang bird feeders with different types of bird food.
    Plant native plants that flower and fruit.
    Provide nest boxes and nesting material.
    Provide a source of water.
    Mark large windows with decals or streamers to prevent birds from flying into them.
    Keep your cat indoors! (Cats are very good at catching birds.)
     What YOU Can Do to Save the Rainforest
    Support companies that reduce rainforest destruction: Buy SmartWoodCM -certified wood products and produce from ECO-O.K.TM -certified farms.
    Choose products that conserve energy: Buy energy efficient appliances, energy saving windows and fuel efficient cars. Be an environmentally responsible consumer. Look at Socially Responsible.com for a listing of responsible retailers, businesses and organizations.
    Look for products with minimal packaging: Do you really need individually wrapped juice boxes or can you use a thermos instead? Packaging makes up almost 50% of our garbage by volume.  (Source: American Museum of Natural History's Center for Biodiversity and Conservation.)
    Buy products that are made locally: Products generate pollution when they travel, whether it's by train, truck or plane.
    Use the right paper: Look for paper that is certified, or made from recycled products or tree free fibers such as kenaf or hemp.  Choose paper that has been processed without chlorine. Always use the back of a sheet of paper when you can.
    Reuse and recycle: You can recycle just about anything these days. Return your hangers to the dry cleaners and use milk cartons as planters for spring and summer seeds.
    Write letters to your elected officials: Let them know how much conservation issues matter to you. For US residents, the League of Conservation Voters is a good information resource, providing environmental scorecards for all members of Congress.
    Join an organization: Support groups that work to protect tropical forests, like the Rainforest Alliance.
    Support locally based organizations in tropical countries: Donate to our "Allies in the Rainforest" program.
    the Rainforest Alliance: canopy@ra.org


    BIRD CALL

    MATERIALS; 2" hardwood, eye screw, resin powder

    Take a close grained hardwood such a rock maple or mountain ash, about 2" long.
    Drill a hole in one end, slightly smaller than the screw threads of your eye screw. Turn the eye screw into it. Unscrew the eye, put a little resin powder in the hole. As you twist the screw back and forth in the hole, very slowly, you can make a chirp chirp or trill in loud, clear notes.
    With practice, this device will produce an astounding variety of bird noises.
    Paint or decorate if desired.

    Actually, Rosin is the solid form of the liquid resin, so you will probably
    be more successful if you look for for Rosin Powder that is usually available
    in Sports Stores as Rosin Bags.

    To Project Index
    Back to Roundtable
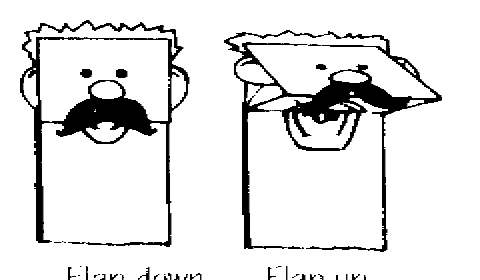
    PAPER BAG PUPPETS
    Your puppet's features may be drawn directly on the paper bag, but a more interesting puppet results 
    when features are made with bits of colored felt, construction paper, or other materials. Use bright colors. puppets-1
    To give the impression of speaking to your puppet, put the top of the mouth at the bottom of the flap, and put the bottom lip directly underneath on the front of the bag. This will cause the lips to meet.
    Open the flap and finish the mouth so that it will be continuous. (See top illustration.) puppets-2
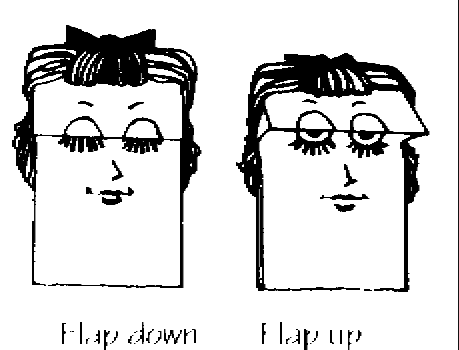
    For a puppet that will open its eyes and then close them, locate the tops of the eyes at the bottom of the flap and directly under the flap front of the bag. Under the flap, make the eyes open. (See lower illustration.)

    MORE PUPPETS IN STORIES AND SKITS

    ARTISTIC GENIUS
    Scene is an art show at which a number of brightly splotched canvasses (poster boards) are on display. The judges arrive, inspect them and finally select one for the prize. It is more brightly colored than the rest. "What imagination?' they say. "What genius?' They call for the artist, who appears in a beret and flowing tie. When the winning picture is shown to him, he says, "Oh, my goodness, that got into the show by mistake. That's where I clean my brushes!"
    Animatics

     
    Remember……
    What I hear I forget
    What I see I remember
    What I do I understand.
    Great Minds discuss ideas
    Average minds discuss events
    Small minds discuss people.
          Trapper Trails Council

    To Project Index
    Back to Roundtable


    EASY TO MAKE POTATO PRINTS
        What you need:

           Large potato, cut in half
           Pencil
           Knife for cutting shape
           Acrylic paints or different colored ink stamp pads
           Paper

    1. Cut the potato in half and pat it dry with a paper towel.
    2. Using a pencil, draw an outline of a shape on the cut surface of the potato. Simple shapes work best.
    3. Carefully cut away the area outside your shape. Cut around the shape and then out to the sides so that the pieces come out, and cut down about 1 inch.
    4. Pat the surface of the potato dry. Put some paint into a tray or plate, and dip the potato shape into it, OR press the shape into a colored stamp pad.
    5. Press the potato gently straight down onto the paper, then lift it straight up, so that it will not smudge.
    www.makestuf


    Back to Top
    Back to Cub Scout RT


    WHITTLING
    Bear Achievement 19
    Bear Cub Scouts are ready to learn how to care for and use a pocket knife, so training in the Den meeting is good for them. Hard woods are difficult to carve and ask for accidents and discouragement Pick up soft wood scraps at the lumber yard, purchase some balsa wood blocks, or better yet, ask each Cub to bring a bar of soap from home to carve. (Ivory is fairly hard and flakes off when it is carved.) There are pre-printed Scout slide kits available at Scout stores.
    Some ideas for carving projects for March are shamrocks, flowers, baby animals, or the Cub Scout sign.
    WHITTLIN' CHIP

    KNIFE SAFETY LINKS:


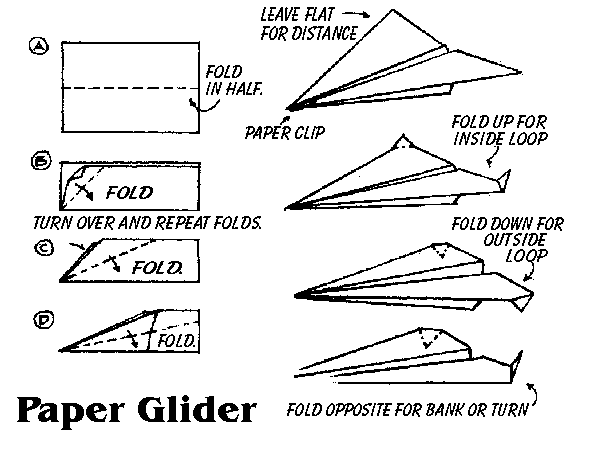
    KITES AND PAPER AIRPLANES

    March is often called the windy month. As temperatures get milder, there can be a lot of wind. It is a good time to do some science activities that use the wind and air.
    First, here are a couple of things to think about and try to answer on your own:
    f.com
    To Project Index
    Back to Roundtable

    Paper Glider
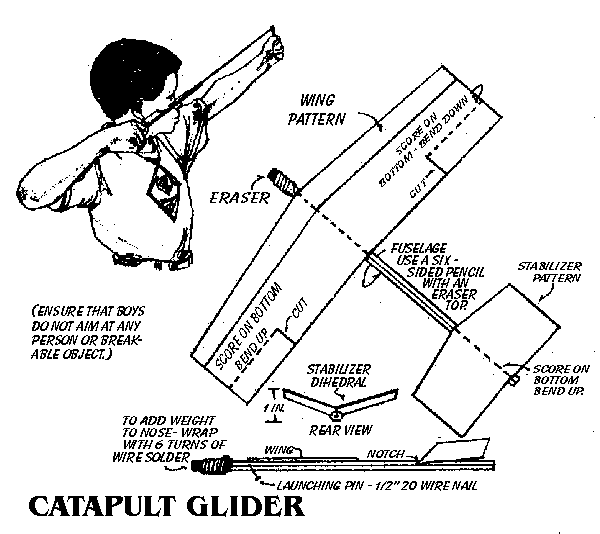
    Catapult Glider
    RING WING GLIDER
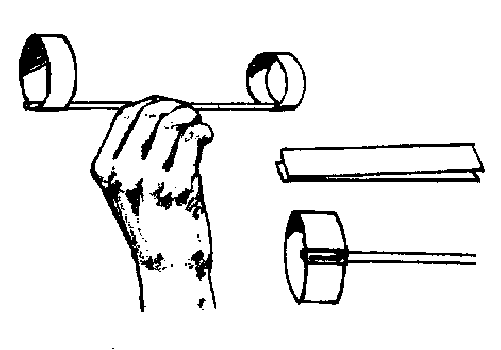
    Ring Wing Glider You need a sheet of 8- by-11-inch construction paper, two paper clips, and a plastic drinking straw. Cut two strips of paper: one 1 1/2 by 11 inches, the other 3/4 by 11 inches. Lay paper clips so they point toward each other. 
    Fold the narrower strip of paper in half, then make it into a loop with ends overlapping and slip it into one of the paper clips. Make a larger loop of the wider strip and attach it to the other end. With the smaller loop pointing forward, give the glider a firm push; it does not require a throw. You can adjust the flight path by increasing or decreasing the size of the larger loop.

    To Project Index
    Back to Roundtable


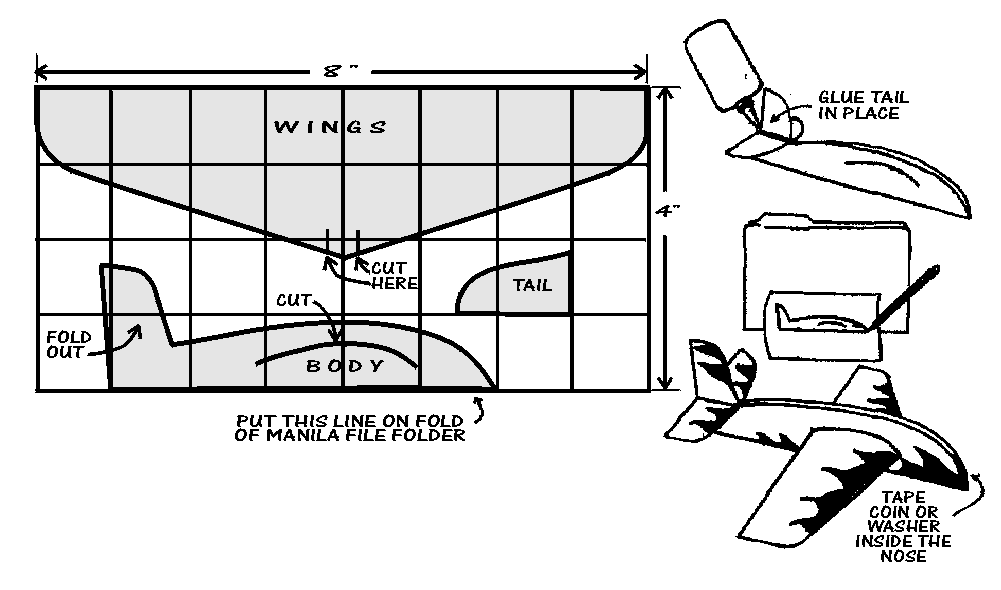
    GLIDER FROM MANILA FILE FOLDER
    Plans for Manilla Folder Glider
    Enlarge patterns by the grid method so that the wing is about eight inches, the fuselage five inches. Trace patterns on manilla file folder; put fuselage on fold so that it will be doubled. Cut out with shears or utility knife.  Put tail piece all the way down between rear wings and tape or glue in place. Fold out rear wings. Slip big wing into fuselage. Cut and slide forward until wing cuts fit into fuselage. Glue or tape coin or small washer inside nose. Decorate with acrylic paint or marking pens. If glider sinks, try a smaller coin or washer in the nose and bend up rear wings slightly
    And Check Out

    UNCLE JONATHAN'S EASIEST KITES EVER.
    For 20 Kites in 20 minutes
    WIND CHIMES
    Make wind chimes from a variety of materials. Use wire or nylon fishing line to suspend the chimes. To secure the knots made with the nylon line, add a dot of household glue.

    Shells: For a wind chime made with shells, use nylon line to suspend shells from a plastic lid. Use a fine drill to make holes in the shells; simply poke holes in the plastic lid. Decorate lid with more shells, glued on with household cement.

    Tin Can Lids: For this wind chime, use a wood crossbar and cut all sizes of can lids for the chimes. Paint with enamel if desired. Punch holes in lids with a nail and hammer. Attach chimes to wood crossbar with nylon string and thumbtacks.

    Venetian Blinds: Use kitchen shears or tin snips to cut pieces from mini blinds or other blinds. Use a longer piece for the crossbar and shorter ones for the chimes. Punch holes using a paper punch or nail and hammer. Suspend chimes using nylon line.

    Pill Bottles: Hang plastic pill bottles around the bottom of an inverted plastic flowerpot. To make holes in the flowerpot and the bottoms of the pill bottles, use a heated needle. Push the end of a piece of nylon line through the bottom of the bottle, then tie on a bead or piece of toothpick so that line can't slip back through hole. Tie the other end to the flowerpot.

    Utah National Parks 1993-94 Pow Wow Book, Bill and Karen Dellos
    To Project Index
    Back to Roundtable

    SCREEN PRINTING
    Bear Elective 9
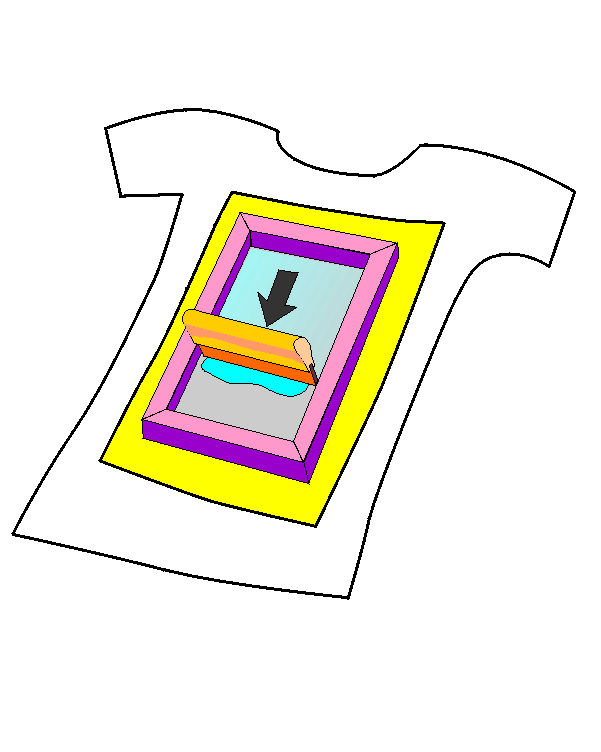
    Silk screen printing makes a good den project. You can use it to make camp T-shirts, neckerchiefs, flags parade banners and other neat things. It's messy enough to hold the interest of boys and the results can be quite impressive. It does take a modicum of skill so I would suggest a bit of practicing before hand.
    You will need the following equipment:
    a silk screen frame - you can buy them made up or make you own.
    a squeegee  - available in most art supply stores.
    screen ink  - also from art stores. I strongly suggest the water soluble type (Hunt's) for starters.
    a stencil - paper stencils are ok for den projects or photo emulsion for larger runs.
    a flat work surface large enough for the screen and the article you're going to screen.
    lots of newspapers to cover the work surface and other things you don't want to get inked.
    a small hand-held 
    scrub brush.
    - for clean up. If you're lucky enough to have one of the old laundry tubs, use it. Bath tubs work ok too.

      LINKS:

    Silk Screen Printing For Fun
    Instructables - Screen Printing: Cheap, Dirty, and At Home
    Live journal - Cheap screen printing tutorial


    PAPER STENCILS
    Paper stencil
    Most commercial outfits use photo emulsion or lacquer stencils, but paper stencils work well for Den projects and they are much faster and cheaper.

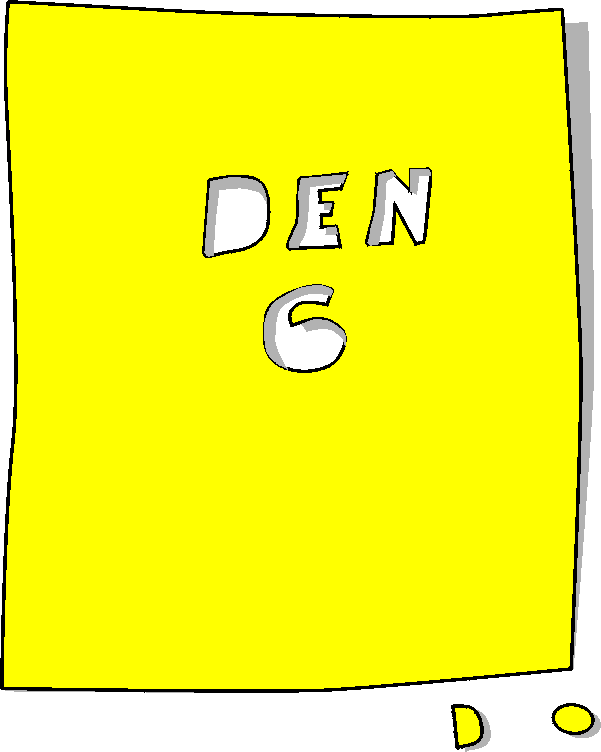
    Cut out a pattern on a sheet of paper. Use a grade of paper that doesn't readily absorb water. Make sure that you save the pieces that form the inside portions of the "D" and the figure 6.

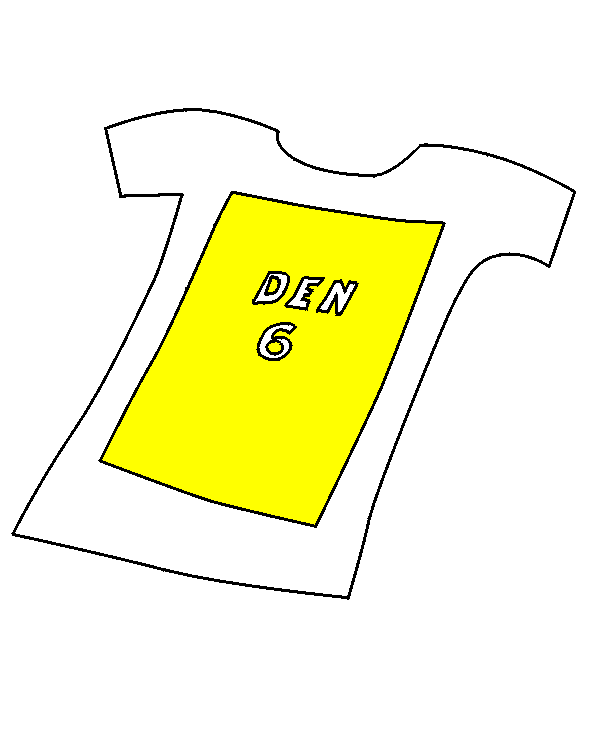
    Position the stencil Place several thickness of news paper under the material you are screening. For T-shirts, place news paper inside the shirt so that the ink doesn't leak through to the back of the shirt. 

    Place the paper stencil exactly where you want the design to end up on the material. Make sure that the little "islands" that form the insides of the D and 6 are properly positioned.

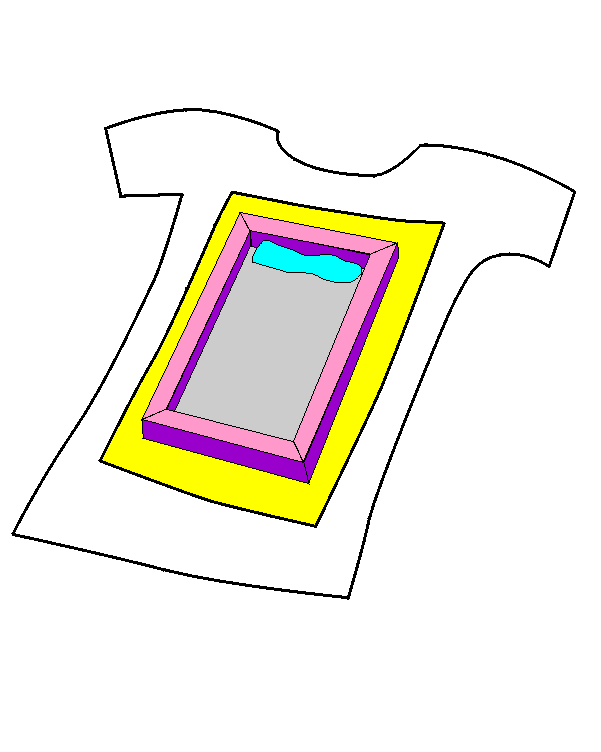
    Position the frame Carefully lay the silk screen frame on top of the paper stencil. Make sure that the edges of the paper stencil extend beyond the frame to prevent the ink from accidentally going past the edge of the paper and onto the material.

    At this point you must be careful not to let the frame, the stencil or the material move.

    Spoon a line of textile ink onto the screen near one end of the frame.

    Draw the squeegee Using a squeegee, wide enough to cover the entire cut-out design, draw the ink down the length of the frame. It is best to lean the blade in the direction of the draw at and angle of 45-60 degrees elevation. 

    Make your first draw a practice run so that you can get a feel for how much pressure to exert in order to make a good image. 

    Lift the frame Lift the frame straight up from the material, being careful not to smudge anything. 

    The paper stencil, will adhere to the screen and all the pieces will
    stay in their proper positions. You can then lay the frame down on the next T-shirt and continue screening the same design.

    Depending on the detail and the grade of paper, you should easily get 20 or more copies from a single stencil.


    Papier Mache Masks -

    Masks, helmets, hats and any other things can be made from Papier Mache. There are many recipes for this medium, but the following one works especially well for children because it usually dries in 24 hours, depending on the humidity.
    Papier Mache paste:
    • 1/2 cup powdered laundry starch
    • 4 cups water
    • 1 cup flour
    Mix ingredients in a large bowl or pan. Spread newspapers over your work areas. Tear other newspapers into stripe no more than 2” wide.  Dip a strip of newspaper into the paste, covering both sides of the strip completely. Than gently run the strip through two fingers over the bowl, to remove excess paste, and place on your form. Use your fingers to smooth out wrinkles and dampen dry spots. cover the form with more strips, overlapping slightly till form is covered.  Three layers of strips should be applied - the first layer all in one direction, the second layer should go at right angles to the first, and the third at right angles to this second. Set aside on rack to dry overnight. Most projects will dry the next day.
    Paint or decorate the dried project with paints and colored papers. A finished papier mache project may be varnished for a shiny and more permanent finish.
     

    Forms: Use balloons for round shapes like masks, heads or torsos; corrugated cardboard boxes for
    rectangular shapes, rolled up newspaper for arms and legs. Use masking tape to combine things
    to form large irregular shapes like animals, aliens or volcanoes.

    LINKS:

    To Project Index
    Back to Roundtable


    LINKS

    Crystal Growing:
    Rockhounding, Arkansas
    ScienceNet
    Creative Science Tutorial for Children at Home
    YES Mag
    Bizarre Stuff-Crystals
    Bizarre Stuff-Charcoal Crystals
    Katherine M. Sheets
    To Project Index
    Back to Roundtable
    W. T. Smith