|
There aren't many topics that are more challenging and more difficult for people to learn
when mapping in Wolf than the proper use of detail and hint brushes. This is because to
have a true understanding of the proper use of detail and hint brushes, one must understand
the compile process that occurs when converting a map file into a BSP file. Not only that,
but you also need to understand how the Quake3 engine draws the level based on the BSP file
created from your map. Well, I'm going to attempt to explain them without getting too technical.
I'm not an expert by any means. In fact, I learned everything I know by reading the works of
other experts. I'm just a guy that has taken the time to really understand the use of detail
and hint brushes.
A note to you folks out there that are experts, if you're reading this and find some things
that aren't 100% accurate, most likely I've consciously chosen to simplify it to make it
easier to understand. However, if you see something that is blatantly wrong, please let me know.
Where to start? Well, I'm assuming you've used gtkRadiant(or wolfrad) and are familiar with the
process of building a level. You don't have to be an expert at building levels, but you should
understand how to create a few rooms and how to connect them together. Also, you should know how
to compile your map and even load it up in Wolfenstein. If you don't know how to do these things,
then this document is probably over your head. You'll want to wait and come back to this after
you've gotten more comfortable with the basics of creating a level.
There are a few things you must know if you want to really understand and optimize your level.
First, the /r_showtris command. When in the game, you can type /r_showtris 1 in
the console and this will show you all the triangles being drawn by the game engine from any point
within the level. This is a crutial command. This will allow you to verify your hint brushes are
working the way you intend them to. Another command that works along with /r_showtris is
/r_lockpvs 1. What this command does is lock the currently drawn triangles (displayed
from /r_showtris) so you can move around the level and really see what is being drawn.
To disable these commands, use /r_showtris 0 and /r_lockpvs 0.
Another important tool you must learn to use is the portal file. The portal file is created during
the BSP phase of your compile. This file is used during the vis phase to determine what is visible
and what is not. If you simply run the BSP process, the .prt file will not be deleted however, if you
run the vis process, the portal file gets deleted when it finishes. You can avoid this by altering
the command line used by radiant. You simply need to add a -saveprt switch after -vis. Once you've
created the .prt file you can load it up in radiant to see exactly where your portals are. To load
it up, use the Portal Viewer plugin under Plugins->Portal Viewer->Load .prt file. FYI, for me, the
3D view doesn't work, only the 2D view.
Ok, all the boring stuff is out of the way, on to the tutorial.
There are two types of brushes. There are structural brushes and detail brushes.
Structural brushes are the default type of brush created. Unless I say otherwise, when I mention
a "brush" it is assumed to be structural. I will explain detail brushes later in the tutorial.
The BSP phase of compiling is where the compiler creates the user accessible spaces based on your map
layout. What this means is that it is basically "carving" usable space out of the "void". So, let's say
you have a map that looks like this from the top view:
The first step is for BSP to break this map into smaller player accessible pieces, called leaf nodes.
A leaf-node is simply a volume of space that contains no structural brushes. It is no more difficult
than that. Don't let the fact that it is a weird term fool you. With out getting too technical, just
accept that the bsp process does some magic (i.e. a recursive algorithm) and ends up with a bunch of
leaf-nodes. The key thing to remember is that leaf-nodes cannot have structural brushes in them.
|
Techie Talk: What actually happens, is the BSP process takes the first brush you created (brushes
actually get numbers internally as you create them, starting with 0), and picks a brush face. It
then creates a plane from that face in all directions until it hits another structural brush. Moreover,
it will usually pick the face that will split the most brushes to help keep the tree balanced. (read
Spog's paper on this for a much better, more detail explanation of exactly what happens)
|
Well, ok you say, what does that mean and why do I care? Well, I'll show you. After I run the
BSP process on the map above, I load up the portal file (using the Portal Viewer plug in), I get this:
Notice there are 4 leaf-nodes. One in the top room, two in the hallway and one in the bottom room.
The places of interest are here where the black lines are. Those are called "portals". That's where
two leaf-nodes touch. It is basically like a "doorway" between leaf-nodes.
The way BSP determines where to place a portal (another term to describe a portal is a "split")
is by extending a plane (a plane is just a flat surface) from one of the structural brushes. For example:
The red line indicates the plane that was created.
That's what BSP does to a nice, clean, empty room. Now lets add some miscellaneous
"clutter" to the top room. The clutter in the top room consists of a shelf, a desk,
a file cabinet and a light fixture, a fairly ordinary room. Here's the map:
Here it is after the leaf nodes have been created:
Can you say "ugh!"? By my count we now have at least 25 leaf-nodes in this one room! What the hell
happened? Remember, there can be no structural brushes inside a leaf-node. That means that the BSP
process had to create multiple leaf-nodes to fill up the room by working around all the brushes that
made up the desk, shelf, light fixture and file cabinet.
I'm going to have to jump ahead a little bit to explain that. The ramifications for this kind of
mess is seen in the vis process. First, a rundown of what the vis process is and does.
The vis process is where the compiler determines exactly which leaf-nodes can be seen from every
other leaf-node in a level. It creates what amounts to a "look-up" table that is used by the game
engine. That way, when you're in a small room, the engine doesn't have to draw the entire level.
Based on the look-up table, it knows exactly which leaf-nodes are visible. Lets step back and
look at the first example again

Here we have the 4 leaf-nodes created earlier. Imagine that you are standing in leaf-node 4.
What is going to be visible? Leaf-nodes 2 and 3 are both visible. How is this determined? It is
determined by drawing an imaginary line from the portal between 3 and 4 out in all directions.
If that line touches another portal, then any leaf-node touching that portal is drawn. So, in
our example, the lines look like this:
So you see that from room 4, the only other portal that can be seen is the portal between 2 and 3.
That means, our vis table for room 4 would list 2 and 3, meaning that from leaf-node 4, draw leaf-nodes
2 and 3. Now, what happens when you move into leaf-node 3? Well, applying what we know so far,
that means portals 1, 2 and 4 would be drawn.
Taking what we've talked about so far, we can build our own "vis table" real quick:
| Standing in leaf-node |
Leaf-nodes drawn |
| 1 | 2, 3 |
| 2 | 1, 3, 4 |
| 3 | 1, 2, 4 |
| 4 | 2, 3 |
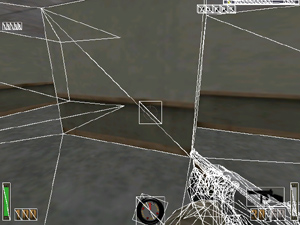
Here is a screenshot with /r_showtris activated. This shows everything in the level that is drawn
from leaf-node 4:

Here I am moved all the way up, right next to the portal we know exists between leaf-node 3 and 4.
Notice, the other room is still not drawn:
And finally, here is what happens when I move a single step over the portal we know is there:

Notice the entire room is drawn, even though technically I can't see it from where I'm standing?
That is because I'm in leaf-node 3. It doesn't matter where you are in a leaf-node, everything
that can be seen from any point within that leaf-node is going to be drawn.
Now, its time to apply all this to our earlier example of our messy room with the multiple leaf-nodes:
So, taking what you know about the vis process and the vis table into account, think about how
that applies to this room. Now, the vis process has to go through each one of the leaf-nodes in
that room and figure out exactly what can or can't be seen. Think of how much larger and more
complex our vis table is going to be.
Detail brushes are just like normal brushes you create except for one significant difference: they
do not cause splits during the bsp process and they do not block the "line of sight" used during
the vis process. So how does that help (or hurt) us? Lets take our room with clutter in it and
turn all the clutter into detail brushes (you do this by selecting the brush and pressing CTRL+M or
choosing Selection->Make Detail) and rerun the bsp process and look at our portals again:
Notice how our room now looks much better. We don't have an ungodly number of leaf-nodes that are useless.
So, does that mean you should make everything in your level a detail brush? No. There are some obvious
rules you should follow and some more subjective situations where you might not want to make the "clutter"
in your room a detail brush. First the obvious.
Detail brushes cannot touch the outside "void". This is perfectly logical if you understand what
I mentioned earlier about detail brushes not blocking the "line of sight" of the vis process. If you
have a detail brush as an outside wall, that means, as far as vis can tell (and BSP for that matter),
your map is leaking. Therefore, all brushes touching the void must be structural.
For the subjective. Nine times out of ten, I'd say that it is ok to make everything in a room detail
(again, this excludes any brush touching the void). It makes your vis process much faster and more
efficient. The only time I don't recommend making something detail is if it would be useful for forcing
a split. I'm not going to get into an example just yet. That'll get covered during our discussion on
hint brushes.
One last thing before we move on to hint brushes (there always is "one last thing" in these kinds of
tutorials isn't there?). There is a default BSP split for maps. By default, there is a split through
your entire map every 1024 units. You can see this split in the editor by going to View->Show->Show
Blocks. This is a great thing to use to your advantage. It's also important to keep in mind to make
sure you have the most efficient splits possible. For example, here are our two rooms again, this time
with Show Blocks on:
Now, I'm going to move my rooms to be on top of the splits and then rerun BSP and load up the portal file:
Notice all the addition leaf-nodes created from my poor placement of my rooms. There are now 9 leaf-nodes
where there used to only be 4. You can actually change your default block size by setting the worldspawn
key "blocksize" to another size, say 2048. Just keep it in a power of 2. Generally speaking though, you
don't need to change this. The only time I know of when it is recommended is when you have a large outdoor map.
That's all of part 1. Head over to Part 2 for an explanation of hint brushes.
|