 In
diagram #1, the Red pieces on 1 and 3 make up a "bridge." My mind refuses to
understand why it is called a bridge. But it is an important feature of many
endings.
In
diagram #1, the Red pieces on 1 and 3 make up a "bridge." My mind refuses to
understand why it is called a bridge. But it is an important feature of many
endings.Return to my Checkers pages
Go to my home page
Copyright 1997, Jim Loy
You may print this and show it to others.
But, this article will eventually be part of a book that I am writing. So,
please do not distribute it widely.
If you need help reading checkers notation, please print out the numbered board.
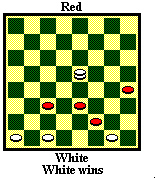
Note: Diagram #1 says "Red draws / White draws." This means that if Red moves then White draws, and if White moves then White draws.
In
diagram #1, the Red pieces on 1 and 3 make up a "bridge." My mind refuses to
understand why it is called a bridge. But it is an important feature of many
endings.
Here, in order to king a piece, White had to establish a piece on 10. This piece is now a weakness and a target. Depending on the situation, the weakness may be bad enough to lose.
In diagram #1, if it is Red's move, White has the move, and an easy draw: 19-23 2-7 23-18 7-11 (7-2 is perhaps a more obvious draw) 18-14 11-7 14-9 7-2 draw.
Again, in diagram #1, if it is White's move, the draw is much more difficult: 2-7 (2-6 19-16 28-24 16-20 24-19 20-24 19-16 24-19 to same) 19-16 7-2 16-11 28-24 11-16 2-6*(A) 16-20 24-19 20-24 19-16 24-19 16-11 draw. I originally thought that this position was a Red win. Gwyn Judd pointed out my mistake, at note A.
A - 2-7 (24-20 16-11 RW) 16-20 24-19 20-24 19-16 (19-15 1-6 RW) 24-19 16-12 19-16 7-2 16-11 RW.
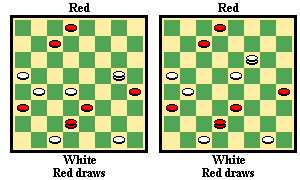
 The
best way to deal with a bridge is to demolish it. Maybe that's not good advice
in everyday life. But it is in checkers. In diagram #2, White's easiest draw is
31-26 28-32 26-22 32-27 22-17 27-23 10-7 draw.
The
best way to deal with a bridge is to demolish it. Maybe that's not good advice
in everyday life. But it is in checkers. In diagram #2, White's easiest draw is
31-26 28-32 26-22 32-27 22-17 27-23 10-7 draw.
Addendum #1
See Petterson's Drawbridge, and A Bridge Ending by H. Morrall.
A couple tricks:
 1.
Here is a bridge ending that White wins. Try to see what you can do to win.
1.
Here is a bridge ending that White wins. Try to see what you can do to win.
The win: 15-19 22-26 (to prolong the game, Red has to give up the piece with 23-26) 19-24 27-31 29-25 20-27 25-22 WW.
 2.
In the second diagram, we see a trick that often draws, for the weaker side.
Here it wins, because White has foolishly lined up his pieces for Red's shot.
Red's win: 21-25 30-21 23-27 RW.
2.
In the second diagram, we see a trick that often draws, for the weaker side.
Here it wins, because White has foolishly lined up his pieces for Red's shot.
Red's win: 21-25 30-21 23-27 RW.
 On the
left is another example of the previous trick, which came up in my study of an
opening. White can draw in a couple of ways, but the easiest is: 32-27! (21-17
draws) 23-32 12-8 3-12 10-6 draw.
On the
left is another example of the previous trick, which came up in my study of an
opening. White can draw in a couple of ways, but the easiest is: 32-27! (21-17
draws) 23-32 12-8 3-12 10-6 draw.
 Addendum #2:
On the right we have two positions which occur in rapid succession in Churchill's Compilations, where a White win is claimed. You should be able to find the nearly identical draw in both positions. These positions come about like this:
9-14 22-17 6-9 26-22 11-15 24-19 15-24 28-19 8-11 22-18 11-16 17-13 1-6 (2-6 draws E. Fuller) 31-26 16-20? (7-11 may draw) 25-22 14-17 21-14 10-17 29-25 17-21 18-15 (22-17 WW E. Churchill) 4-8 22-17 7-10 25-22 3-7 22-18 9-14 18-9 5-14 19-16 10-19 17-3* 19-24 23-18? (23-19 WW) 24-31 26-22 12-19 3-12 19-23 22-17 31-26 12-16? (Red probably has a difficult draw after 18-14) [first diagram] 26-22? (21-25 draw) 18-15? 22-26 16-11 [second diagram] 26-31? (21-25 draw) to a WW, E. Churchill.
Addendum #3
Here is a well-played ending:
 J. Searight - A. Jordan, Scotland v England 1899
11-15 24-19
15-24 28-19 8-11 22-18 11-16 25-22 16-20 22-17 9-13 17-14 10-17 21-14 6-10 14-9
5-14 18-9 1-5 9-6 2-9 23-18 10-14 18-15 7-11 15-8 4-11 29-25 14-17 25-22 9-14
22-18 14-23 27-18 17-22 26-17 13-22 19-15 12-16 15-8 3-12 18-14 16-19 14-10
19-24 10-7 5-9 7-2 9-14 2-7 14-18 7-10 18-23 10-15 24-27 31-24 20-27
[diagram] 15-19 22-26 19-24 26-31 24-19 31-26 19-24 27-31 24-19 31-27
19-15 12-16 15-19 16-20 19-24 27-31 24-19 20-24 19-28 31-27 30-25 27-24 28-19
26-31 19-26 31-29 RW
Addendum #4
 More examples: This position is from E. Ingram - J. Sprague,
1952 U.S. National: 12-8 (White moved 2-6? and lost) is a simple draw.
More examples: This position is from E. Ingram - J. Sprague,
1952 U.S. National: 12-8 (White moved 2-6? and lost) is a simple draw.
 On the right is a position from V. DeLong - P. Semple, 1952 U.S.
National (p.11). The solution: 22-18* (Red moved 22-26? to lose; you might want
to check out that it does lose) 14-10 (or 13-9 similar) 18-15* 10-7 23-27*
32-23 28-32* draw
On the right is a position from V. DeLong - P. Semple, 1952 U.S.
National (p.11). The solution: 22-18* (Red moved 22-26? to lose; you might want
to check out that it does lose) 14-10 (or 13-9 similar) 18-15* 10-7 23-27*
32-23 28-32* draw