|
| |
Connecting Two Rooms (basic) |
by nib |
|
This tutorial is a basic tutorial on connecting two rooms, basically showing you
how to make a hallway correctly (almost). I say almost because there will be a small flaw in this method.
Now, this method is problably the most widely used and easiest way of connecting two rooms so don't think the
fact that its flawed means you can't use it. You'll have to make that determination after you read this
and the advanced method of connecting two rooms.
If you went through my "Making Your Second Room" tutorial, you read about how having textures overlaping
is bad. Well, this method has that problem. Then why am I showing it? Just to help people that are
just getting started. This method is an OK method to use, you just need to be aware of the issues, which
I'll point out during the tutorial.
|
|
| |
I'm assuming you have gone through my "Making Your Second Room" tutorial and understand the basics
of creating a brush and moving around.
I also expect that you know how to apply textures and are familiar with the various 2D views.
|
|
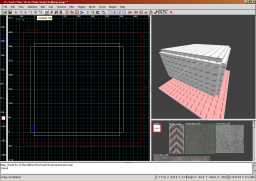
Create your first room. I made mine 384 wide x 384 long x 192 high. Copy that room
and place it next to the original so you have two rooms next to each other with enough room between them
to make a hallway.

Advanced Tip: To select the entire room very quickly, use the "Select Complete Tall" feature. Simply draw a brush that is
a bit bigger than the room (while in the TOP view), and click on the "Select Complete Tall" button. It will select every
brush that is within the bounds of the brush you created, no matter where the brush is in relation to the Z-axis.
|
|
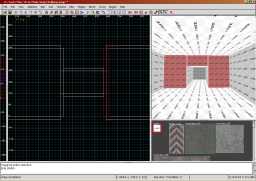
Now, draw the hallway that will connect the two rooms. For the hallway
you only need to draw the ceiling, floor and two walls. Don't draw the two end pieces. Also, because the way
we made the room (again, you did complete the "Making Your Second Room", right?)
the floor brush will be a little bit longer than the other brushes because you want it to be flush with the floor
of the two rooms.

Notice in this shot looking into the room, the wall is still complete, we haven't subtracted anything.

|
|
Now time to make the hallway. I moved the camera inside the right room and selected the entire wall:

Next, size that brush so that it is flush with the hallway:

Then, after it is sized, you can just press the space bar to copy it and move it to the other side of the wall:

Finally, create the third piece to go in the middle:
|
|
Now, just texture it all, being sure to use ctrl+shitf+click to only
texture the face and not the whole thing:

|
|
So, where's the flaw with this method? The flaw is that you have texture
overlap. Look at this picture to see here:

So what's the solution? Well, head over to the advanced version of this tutorial to see.
|
|
connecting_rooms_basic_tut.zip
|
|