|
Defining hint brushes is easy. Using them correctly, however, isn't quite so easy. I'll start with the
easy part. A hint brush is simply a brush you create and apply the common/hint texture to. All it does
is act like a structural brush and force a bsp split during the leaf-node creation process. When you
compile and run the game, you can't see hint brushes and they don't block the player. They are ONLY
used during the BSP process (they aren't used during the vis process, which is a common misconception).
The best way to explain how to properly use hint brushes, is through example. Here is the top-view of
a few rooms:
I went ahead and compiled it and loaded the portal file. As you can see, vis made some fairly
logical splits there. Based on where the info_player_start is, what rooms do you think will be
drawn? Below is a picture of the rooms that get drawn based on this leaf-node layout:


Here is a top view of what gets draw:

In this example, the two rooms at the bottom are drawn (actually, so is the room on the top right,
but that's ok since you're standing right next to it and can look in it). Since there is nothing
in those rooms and they are small, it's really not a big deal that they got drawn, but, what if
those rooms were very large and/or had a ton of detail in them? Maybe it is the sleeping quarters
and has 10 models of bunks with 10 chests, along with tons of other little clutter used in making
your map look realistic. As you can imagine, in a real map there can easily be thousands of brushes
in each of those rooms. If we assume that each room on the bottom has 2000 triangles in them, that
takes up 4,000 of our 15,000 triangle limit (15,000 is a "soft" limit, you can go above that but you
want to keep it down as low as possible). What can you do to prevent these rooms from being drawn?
There is a very important question you must ask yourself before you go hint brush crazy. That question is:
"Is it worth blocking that room?" What do I mean by that? First, realize that adding hint brushes creates
additional splits during bsp (i.e. additional leaf-nodes are created). This will therefore increase your
vis data size, the complexity of your vis table and your vis compile time. Make sure that you are blocking
enough triangles to make it worth the extra hint brushes. If, for example, those rooms were exactly the
way they are in the picture, with only a few miscellaneous items (i.e. not a high tri count), I wouldn't
bother with hint brushes.
| Side Note: As an example, I was helping someone try to lower the r_speeds of his map. I
went into the sewers and saw many, many places where I could put hint brushes. I spent probably an hour
or more placing hint brushes all throughout the sewers. When I was done, I ran vis. Well, his vis numbers
skyrocketed. It took so long I didn't bother finishing it. Then, I decided to check his r_speeds in the
sewers when there were no hint brushes. Well, as was to be expected, since sewers are typically long and
have right angle turns, they have very, very low r_speeds numbers. There was absolutely NO REASON whatsoever
to put hint brushes in there. He was averaging about 2000-3000 triangles while in the sewers. Basically,
I wasted an hour of my time. |
So, for the sake of this example, lets assume there are a massive number of triangles in both of those
rooms on the bottom. How do we prevent them from being drawn while you are at the top of the middle room
like in the pic? The first thing to remember is that vis determines what to draw based on what the portals
can see. Therefore, since the bottom portal can see the portal into the room, the room is drawn:

The most basic way I can explain it is this, since the player can see portal a1 and portal a1 can see
portal b1, the leaf-nodes on either side of portal b1 (i.e. the room) will get drawn. Likewise, the
player can see portal a2 and portal a2 sees portal b2, therefore, that room gets drawn as well.
Considering that, the obvious way to stop the rooms from being drawn is by creating a portal that
blocks the room, yet, can't be seen from where the player is. Let me simply show you the hint brush
placement and the resulting portals, then I will discuss
Here is the placement of the hint brush (hint brush is highlighted in green):

Here is what it looks like in the editor (the camera is at the bottom of the room, looking up towards the info_player_start):
And here is what it looks like after a compile and loading up the portal file:

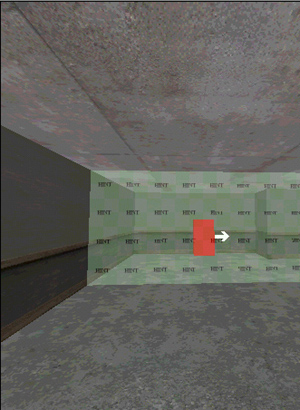
And finally, here are a couple shots in game, showing the triangles not being drawn:


There are a few things to notice regarding the placement of my hint brush. First, it goes from floor
to ceiling. It has to. Don't forget we're working in 3D. My examples have kept everything in 2D for
simplicity, but remember, it's a 3D world. Second, I made a large brush instead of a flat thin brush.
In some cases you'll want a flat thin brush, and in others you'll want a large brush like I did. The
thing to remember is that every face of your hint brush will make a split during BSP. So, had I made
the brush just a thin partition in the main room, it would have created an extra leaf-node like this:
Instead, since I made it square, and I made each of the sides bump up against a structural wall or a
place where I already knew there would be a portal, I only created 1 extra leaf-node instead of 2.
| Editors Note:
This is NOT, and I repeat NOT, the most effecient placement of a hint brush in this situation. I placed
it this way to show the very basics of hint brushes. There are ways you can place hint brushes in this
example that will block more of the area than my example does. Once you've got a good understand of hint
brushes come back to this example and play with it yourself to find a more optimial placement. (think angles)
|
Here's another, more creative example of using hint brushes.
Here is the side view of two rooms on top of each other connected by a ladder:

When we compile with no hint brushes, this is what we get (remember to check your block placement
(View->Show->Show Blocks) and make sure you're not putting your rooms on the default splits):

So what's wrong with this? Well, with this leaf-node setup, when you're in either room, the other
room will be drawn. Remember, since the bottom portal can see the top portal, all the leaf-nodes
that the top portal touches will be drawn. In this case, that means the entire top floor!
Notice the bunk models being drawn in the top floor:

What if our top floor was a complex room with 1,000 brushes? We definitely want to know how to
stop the top floor from being drawn.
Remember, we have two goals with creating hint brushes. First, we want to make our hint brush
create a BSP split (portal) in a manner that prevents that portal from seeing the one leading
upstairs. The second goal is to minimize the number of new portals we create with our hint brush.
Remember, every portal you create increases the vis compile time and makes your vis table more complex.
Here is my placement of the hint brushes:
And here is what it looks like in the editor:

With this layout, no matter where you stand in the bottom floor, most of the top floor won't be
drawn. Here is a shot showing the bunks in the upstairs room not being drawn:

And now notice this, even when I stand under the stairs, the bunks upstairs aren't drawn:

Here's why. From where the player is standing, portal a cannot see portal b (which is why portal b
is angled). Since portal a can't see portal b, nothing to the right of portal b is drawn. Had I
made the hint brush vertical, where portal c is, then portal a would have been able to see it. If
that had been the case, the entire upstairs would have been drawn if the player was standing where
he is in this pic.
Well, there you go. I hope that this has helped you understand detail brushes and hint brushes
a little better. Don't be discouraged if you didn't get all this on the first try, read it
again if you have to.
My understanding of hint brushes can be attributed to 3 sources:
First and formost, SPoG's technical paper.
Secondly, F.P.S.'s tutorial
And finally, djbob and all his wisdom
Here are some files that you may want to download.
This is a printable word version of part 1 and part 2. It isn't exactly like the HTML version but its
pretty close. I made some last minute editing changes to the web. They were mostly grammar changes so
the technical content will be the same. However, as I update this tutorial to fix errors and/or omissions,
I won't be updating this doc. Just keep that in mind.
Also, here are the maps I used for the screenshots. They aren't necessarily built perfectly so don't email
me and tell me I shouldn't have textured the outside faces. :)
|